contents
GUI style: Timeline
— 2021 —Styling the Lumiera Timeline UI
The Timeline is that central part of the user interface where most of the editing activity takes place. It is attached as a top-level panel, holding tabs for several »Timeline« entities present in the model and opened for editing. Each timeline is associated with a »Sequence«, with a fork of tracks, nested to arbitrary depth, and holding an assortment of media clips and further elements of various complexity. Obviously, such a structure presents a challenge for styling with generic CSS rules.
Generic Styling
To cope with this complex and fluid structure, the Lumiera UI uses custom drawing onto a Canvas — combined with custom widgets attached on top of this Canvas. And, in the case of the media Clips, these widgets in turn may hold yet another Canvas, and employ custom drawing combined with further custom widgets. Together, this leads to the following problems:
-
the structure is evolving and can be changed both by future developments and by the concrete arrangement of data in the user’s individual session
-
custom drawing is done programmatically and thus happens completely outside the reach of CSS
-
the highly specific arrangement of widgets has difficulties to retrieve even a sensible basic styling from system stylesheet and will likely miss relevant element’s of the user’s custom theme.
Yet we need and want to support styling and the use of user provided themes; thus, for mitigation, Lumiera establishes a synthetic style structure in combination with some conventions. On start, the Lumiera UI builds a tree of (invisible) pseudo elements in accordance to that structure — and then uses this setup to “fish” for applicable styles through available CSS rules. The resulting style settings are extracted subsequently and used by the custom drawing code for the actual painting and to control special aspects of the established custom widget structure.
Synthetic style tree
Thus we define two synthetic elements for the purpose of extracting styles:
-
the virtual element
forkrepresents “a timeline track” -
and a virtual
frameelement nested therein represents “a ruler on top of a timeline track”
This synthetic structure is rooted at a generic timeline view with
class .timeline__page
[Actually, this code is triggered when creating the first real timeline display
in the UI; it can be found in UiStyle::prepareStyleContext (timeline::TimelineWidget const& timeline).
Since the TimelineWidget is based on the Gtk::Paned, the root element will actually be a paned.timeline_page]
Styles used for the Fork
This leads to the following structure of selectors to attach the actual styling rules
- track fork
-
attach rules to the selector
.timeline__page > .timeline__body fork.timeline__fork
-
the
border-topandborder-bottomrules will be used to draw the nested inset. -
a
marginat top will add additional space between consecutive tracks -
while the
paddingwill be used within the track content area —
of course only in vertical direction, since the horizontal extension is ruled by the time position of elements within the track -
please also note that
backgroundstylings apply to the content area and not the track space at a whole. -
especially a
box-shadowwill be drawn when filling the background of the content area — however, only aninsetmakes sense here, since a regular (outer) box shadow will be obscured and covered up by consecutive drawing actions…
-
- track ruler
-
use a
frameelement and attach rules to the selectorfork.timeline__fork frame.timeline__ruler
-
again the
bordertopandbottomsettings will delimit the ruler form the other track content -
while
marginandpaddingapply as usual outside and within the border -
here the
box shadowwill be drawn with the background and aligned with the frame — and again, only aninsetreally makes sense, while a regular (outer) box shadow must be small enough to stick within the limits of themargin
-
- slopes
-
we use several classes to define the effect of consecutive nested frames forming a common slope; however, we perform this combination effect only with a limit of 5 steps depth. Only closing (upward) slopes can be combined.
-
we use class
.track-slope--deep1for a simple slope (inset by one nested level) -
class
.track-slope--deep2for two consecutive nested steps combined. -
likewise class
.track-slope--deep3for three and class.track-slope--deep4for four combined slopes -
finally, class
.track-slope--verydeepis used for five and more combined upward (closing) slopes
-
- header
-
The track header area to the left of the timeline display is built up „conventionally“, by nested widgets
-
the container spanning the total height of the timeline display (moving with the scrollbar):
.timeline__head -
at the top sits a small navigator control with class
.timeline__navi -
the remaining space below is taken by a »Patchbay« container with class
.timeline__pbay
-
- fork head
-
Located within the PatchbayWidget resides a nested structure of fork head controls
-
each such TrackHeadWidget is derived from Gtk::Grid and marked with class
.fork__head -
the first row in the grid holds a Track Header label and menu, an ElementBoxWidget with class
.elementbox -
the second row corresponds to the content area of the track itself
-
in the second cell in this row resides the HeadControlArea with class
.fork__control— which houses the controls for this track’s scope, i.e. the track together with all nested sub-tracks. -
next comes a padding row to help synchronising track head and track body display
-
Additional sub-Tracks are added as additional lines to the grid, and each such line will hold a nested TrackHeadWidget in the second cell; this also implies that this nested sub-Track head can again hold deeper nested sub-Tracks recursively….
-
The first column to the left side, starting from the second row, will be increased accordingly to indicate the nested fork structure, rendered as a nested set of »stave brackets« with class
.fork__bracket
-
Demonstration of CSS for custom drawing
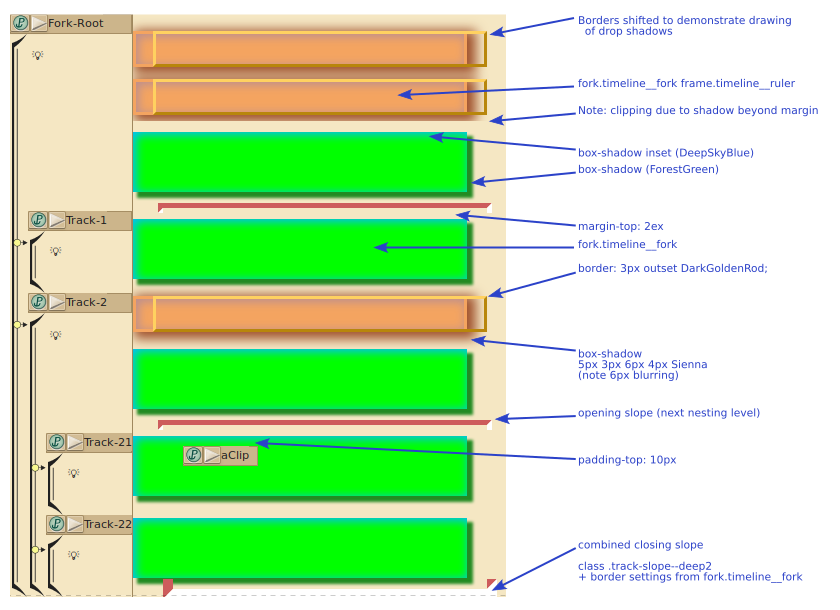
The example below demonstrates how CSS rules are picked up and used for custom drawing of the fork structure onto the Timeline body canvas. For sake of demonstration, the drawing code was manipulated slightly, by shifting borders to reveal the box shadow effect, and to show canvas content beyond the timeline end.
Lumiera used the »light theme complement« stylesheet for this demonstration — thus most of the styles are derived from the custom desktop theme. A few additional class definitions were added for styling of the timeline body display, using rather distinct colours and excessive padding and margins to emphasise their effect on the drawing routine
  .timeline__page > .timeline__body fork.timeline__fork {
    margin: 2ex;
    padding: 10px;
    border-style: inset;
    border-color: IndianRed;
    background-color: Lime;
    box-shadow: inset 2px 2px 5px 1px DeepSkyBlue,
                      5px 5px 2px 1px ForestGreen;
}
  fork.timeline__fork frame.timeline__ruler {
    margin: 1ex;
    padding: 5px;
    border: 3px outset DarkGoldenRod;
    background-color: SandyBrown;
    box-shadow: inset 2px 2px 5px 1px RosyBrown,
                      5px 3px 6px 4px Sienna;
}
TODO 3/2023:
-
should also document the selector for an actual Clip element in a concrete timeline