contents
Lumiera Workflow Proposals
— 16 March 2026 —
I would like to share a collection of workflow ideas for Lumiera. These ideas come from having cut hundreds (or possibly thousands) of videos over the past 20 years as a professional editor, working in Avid Media Composer, Adobe Premiere, Lightworks and DaVinci Resolve.
This document focuses on analysing the behaviour of Non-linear Editors (NLE’s): software in which a user can edit films and videos, in order to discuss possible solutions for the design of Lumiera.
The main ideas behind these proposals are:
-
Editing should feel as organic as possible. An editor should perceive the NLE as an extension of their body, where interaction with the NLE will ultimately become natural. This does not mean that a user should immediately understand everything without there being a certain learning curve. Some new concepts might take a while to master.
-
An editor should not be able to accidentally overwrite part of their work in the timeline when that part is not within sight (in other words: when it’s offscreen). This includes throwing things out of sync, losing transitions, or overwriting clips.
-
Interaction with an NLE shouldn’t depend on a specific device. It should be possible to operate Lumiera with only the keyboard, only the mouse, other peripherals or a combination of these. We can nudge people towards ways of working we think are optimal, but we shouldn’t dictate how to use this application. Many different editors work on many different types of content, and each type of content requires different workflows, some of which we might not even foresee. We can’t make a one size fits all solution in terms of workflow, unless we would target Lumiera at a very specific professional field (for example: only long form films and not short social media content). But even within the same types of content I’ve seen different editors using different ways of working.
So if the aim for Lumiera is to be a general purpose video editing application, then we can not force any specific way of doing things and instead we should support many different workflows, in other words: provide a platform with possibilities for each editor to make it their own (which will arguably be a harder goal to achieve). Instead of a “we know what’s best for you” approach I propose a “smart defaults with many options for configuration” approach.
-
A big question is: who is »the user«? We aim to create a tool for professionals, but there are many types of professionals working in entirely different parts of the media industry or in other fields. In the previous paragraph it was mentioned that different types of content require different types of workflows. How to accommodate all of these different people who work on different things?
I would like to propose a set of personas to keep in mind while designing the application. Examples of such personas could be:
-
The highly specialised editor who works in an environment where different parts of the post-production of a film are handled by different people: assistant editors, colourists, audio engineers, etc.
-
The allround contracted editor who handles all aspects of post-production
-
The freelance editor who does both commissioned work and passion projects
-
The allround artistic/indie filmmaker, who also edits
-
The allround social media creator who values the use of visual effects, motion graphics and sound effects.
And a few subtypes:
-
The free-flowing editor who doesn’t have a fixed idea of how the edit should be and instead wants to play and move things around, and who might not work in a linear fashion: they might do a bit of colour correction to get a better sense of how a scene feels, then go back to editing, etc.
-
The editor who has the film already cut in their head and have a very strong sense of what they want to do and work in a very structured way towards accomplishing this vision.
Of course, there are many more types of people and many people who are a combination of personas. These are only meant to paint the spectrum of possibilities.
-
-
-
Lumiera provides a chance to re-imagine how an NLE could work, in other words: how it can be designed around modern ways of interacting with computers. In that sense there is total freedom to create innovative new solutions to improve how people edit videos. On the other hand, if we create paradigms that are too uncommon, new users might not understand Lumiera fast enough and move on to something else. There’s a balance to be found between providing familiarity and innovation, and we need to think carefully when breaking traditional paradigms about the reason they have existed for so long and if it’s worth breaking them.
In any case, I think we should at least make an effort to study the way current NLE’s work, and while we might never know for sure what the reasoning behind their workflow designs was, we should make an attempt to understand this reasoning. Some designs might have come from technical limitations, and others might have had really clever thinking behind them. Let’s see what we can learn from that.
-
Ideally we should also include workflows for editors using XR headsets in combination with controllers or even hand tracking. While I do have a headset at work that I experiment with, we might want someone with actual XR design skills to be involved here.
Initially I would like to focus on the most fundamental tasks that each and every editor has to deal with while creating a video:
-
Finding the parts you need out of a lot of source material (logging and organising footage)
-
The timeline as the editor’s canvas: inserting and grouping material, arranging clips, trimming and other timeline features
-
Finishing: audio mixing, colour correction, titles, effects, exporting
-
The broader GUI concept
Many of the ideas presented here are not necessarily unique: a lot of these either exist in one NLE or another, or might be more common in so-called Digital Audio Workstations (DAWs). This document closely inspects the working of other software applications to see how we can learn from those.
These proposals are by no means finished or complete. They are merely meant to be the starting point for discussion and would also require user testing. We will want to iterate over certain ideas so that they will evolve over time, while others might be rejected completely, which is totally fine, of course.
The current NLE landscape
A few decades ago there was this idea that only a single application could be called “the best”, in other words: the one true NLE to rule them all. Some even went as far as calling it »the NLE wars«. There was fierce competition between Avid Media Composer, Final Cut Pro, and Adobe Premiere and each had its fans. Over the years this discussion faded away. Final Cut Pro was disregarded by many after the radical rewrite that was released as Final Cut Pro X. Avid Media Composer retained its spot as the industry standard for television and feature film, while Adobe Premiere Pro conquered the rest of the media industry. It became clear that no single NLE would be “the best” for all people and all purposes. They each had their own sets of strengths and weaknesses, and therefore each would find its own audience.
While NLE’s evolved in the 2010’s, differences between them grew.
Media Composer and Lightworks were already very powerful NLE’s, specialised in the core editing process, mostly for longer format productions. They offered many configuration options and in turn had a high learning curve.
Final Cut Pro X sat on the other end of the spectrum. It had few configuration options but was easy to learn. It became popular among a new crowd: the solo content creators.
Then in between sat Premiere Pro, comfortably. It profited massively from being part of the Creative Suite, later the Creative Cloud: for many media companies it was very cost effective to pay Adobe a single sum of money (pre-Creative Cloud) and later subscription fees, and receive all the tools they could possibly need for media creation. But also the application itself was an all-in-one solution for all parts of post-production: it offered many tools for audio mixing, colour grading, visual effects, etc. Sure, Media Composer and FCPX also offered tools for these jobs, but were less developed in these areas and often required plugins to achieve many of the more advanced tasks.
Then came along DaVinci Resolve, a colour grading application that was bought by Blackmagic Design and transformed into another all-in-one powerhouse, which slowly started to take a seat next to Premiere’s throne.
In the meantime the media landscape changed. NLE’s became more affordable and hardware more capable, and the result was that editing was no longer a thing only done by professionals: everybody became an editor, and everybody could edit any moment, anywhere, on laptops, tablets or smartphones. Social media became a huge new platform where many new makers developed their own channels and found an audience for their videos. And so came NLE’s that were focused on social media content, most notably CapCut. It took FCP’s idea of easy to learn even farther and offered many one-click visual effects, automatic subtitles and mostly: a lot of effect presets and assets (titles, other graphics, music) available within the application.
Right now we are witnessing the early stages of the introduction of AI in most NLE’s. This expands the possibilities for manipulating video and audio without requiring much technical knowledge. Voices, music, video clips and even rough cuts can be generated. Audio issues can easily be fixed, mixing and mastering can be done automatically, tracking en keying becomes a lot easier than it used to, to name a few things.
And that’s basically where we are now. There’s not one editor to rule them all, there are many, and they all shine in different fields or sectors. Some NLE’s try to expand and cater to different crowds (Lightworks for example, received an easier GUI and many presets and assets to attract social media content creators), others decided to just keep on doing what they’ve always been good at.
The question is: where will we position Lumiera? Due to targeting the Linux platform, it makes most sense to try and sit in the middle of everything. If we specialise too much, the potential user base might be too small, although in all fairness, this is an assumption not backed by any real world data. Would there be a way to check the validity of this statement? And how should we quantify "too small"? This is a topic that requires more discussion.
Chapter 1: working with source material
This chapter will not cover every detail of the process of ingesting, project organisation and logging. It will focus on the main strategies of how a user goes through all of their material within a specific project in order to select the parts needed for the final edit. I will compare the ways in which different NLE’s handle this and will propose possible directions for Lumiera to support certain workflows.
Project creation
When starting a new project, a user often needs to set the project resolution and framerate. Adobe Premiere (optionally) shows an import panel immediately after this. The first time you drop a clip on a timeline, Resolve and Premiere will ask if you want to change your project settings to match the clip settings, when these are different.
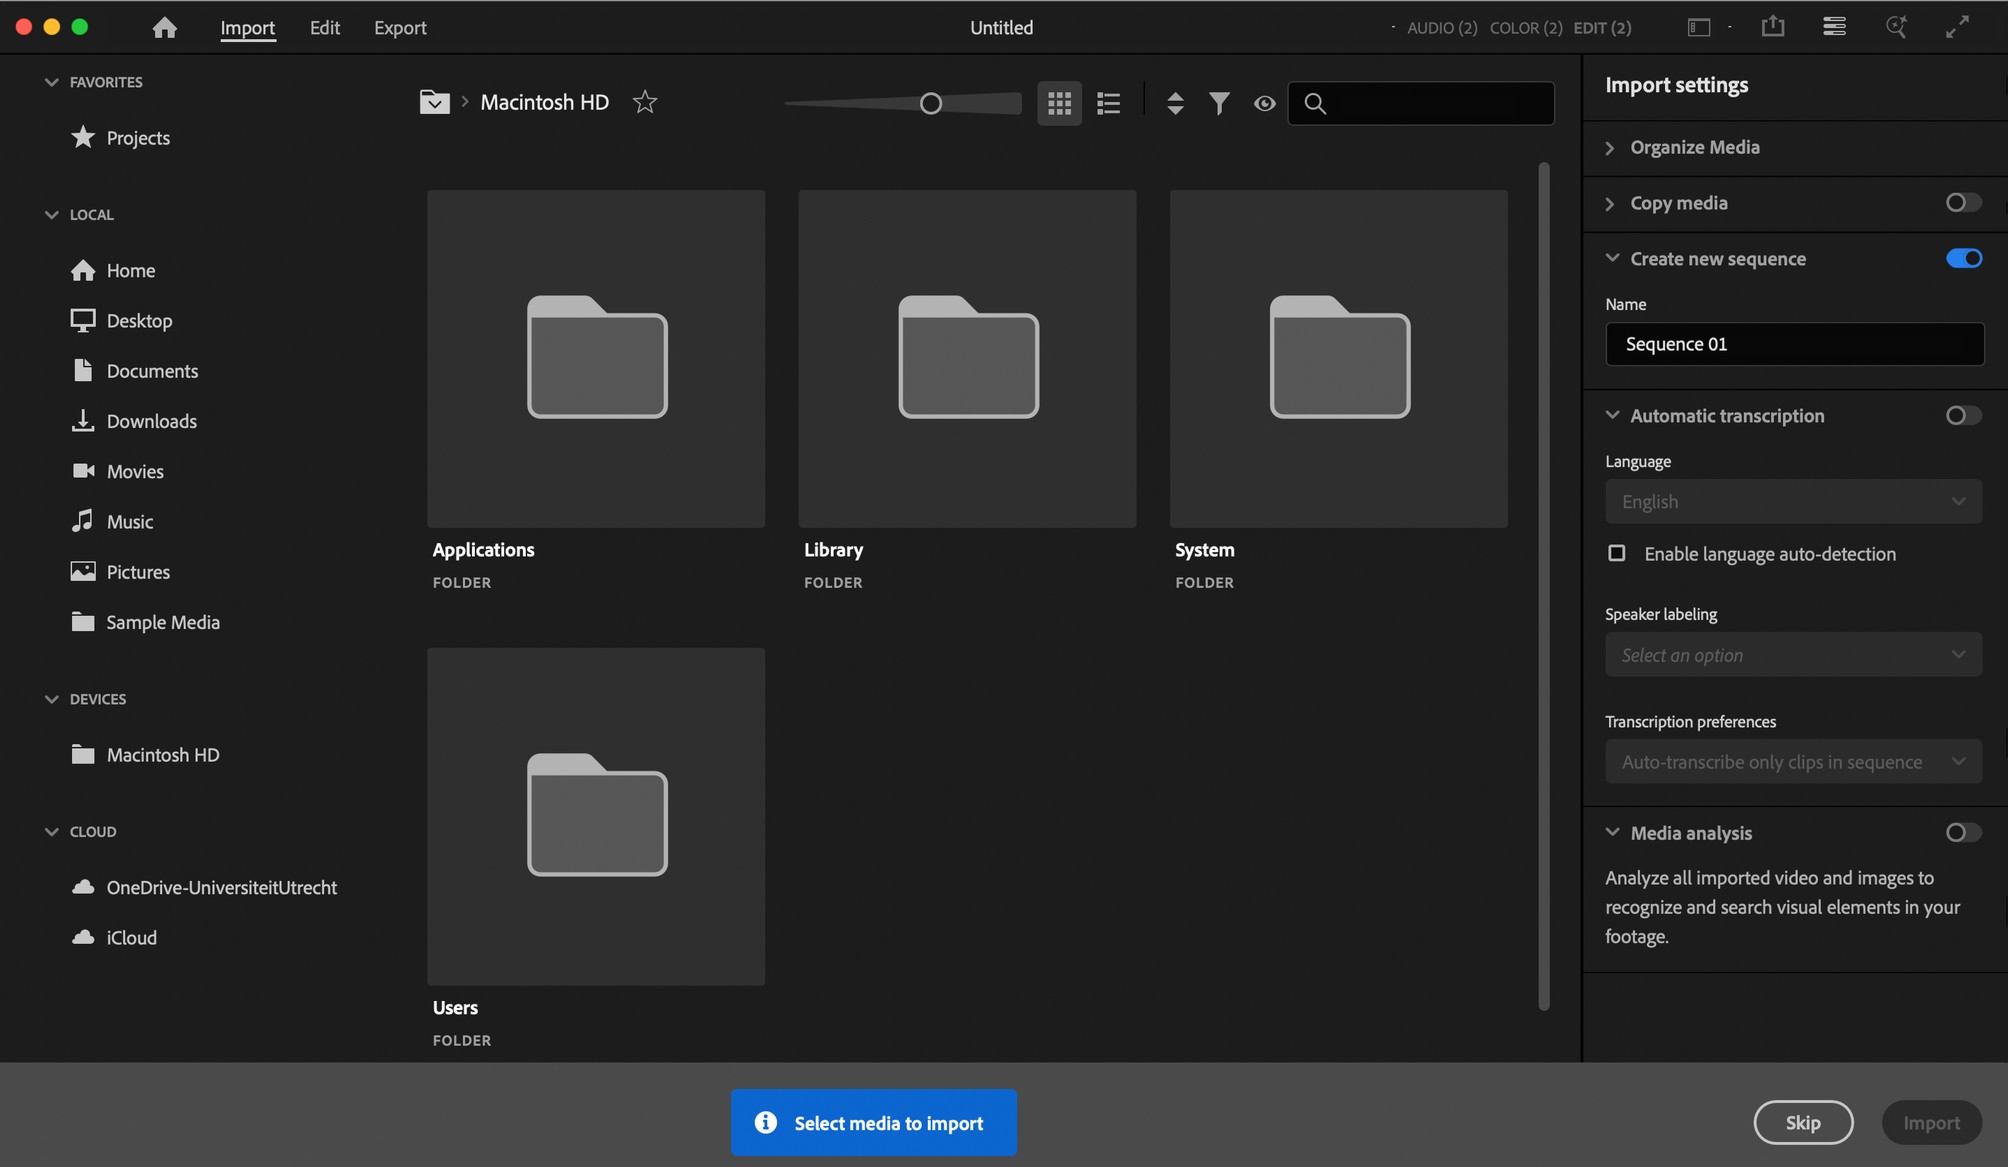
Figure 1. Premiere’s import panel
Projects themselves exist within an application’s database (Resolve), or as a file/folder on local or shared storage (Avid, Premiere, Lightworks, FCP).
One of the first things that needs to be setup is the organisational structure of the project, in other words: the structure that’s going to house all of the project’s contents. Most applications use bins for this, a bin being simply a container for items like video clips. In a sense they are similar to folders on a computer’s storage, except bins usually only exist within the project in your NLE. Avid’s bins also exist as folders on local or shared storage, but this is an exception.
For top level organisation, bins can either be placed in other bins (Premiere, Resolve) or in groups/folders (Avid, Lightworks).
As we’ll see throughout this document, Final Cut Pro is usually the only application that takes a different approach. Projects are called “libraries” and FCP sorts footage based on events (top level containers of timelines, footage and keyword collections), keywords (tags) and collections, instead of bins (timelines are confusingly called “projects”). Footage, when imported, is placed in an event and from there all emphasis is on the metadata, in how you rate and tag (parts of) the footage. This also serves as a replacement of the subclips feature found in other NLE’s.
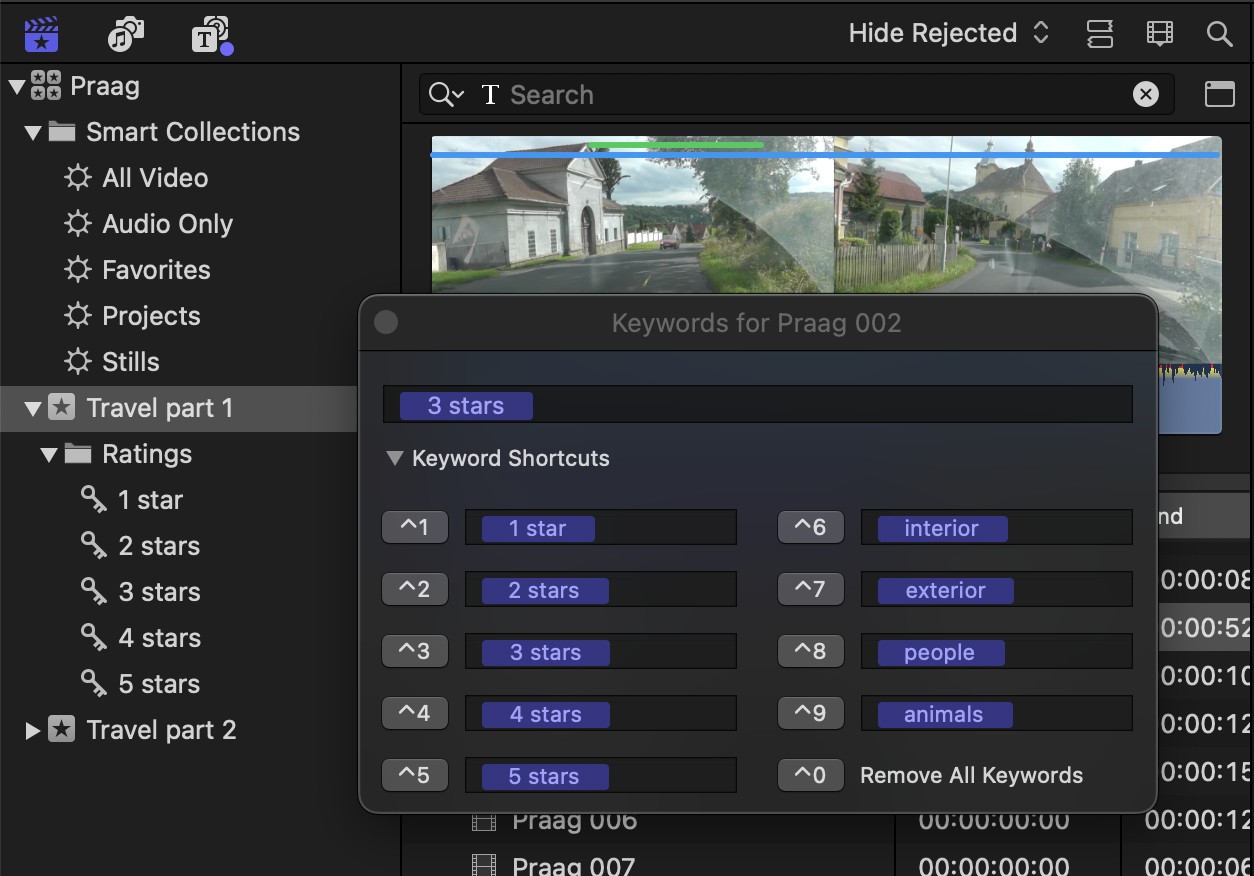
Figure 2. Final Cut Pro’s Keywords dialog.
↑“Travel part 1” and “Travel part 2” on the left are events.
In any case, when working in a professional environment, you will probably want to start with a template that defines your top level structure, instead of having to recreate your entire bin setup for every project. Surprisingly, at the time of writing only Adobe Premiere has introduced a project template feature (in version 2024). In other apps you will need to manually create your own template project and duplicate that, or even literally copy and paste bins from a template project in a file browser (Avid).
Importing footage
Every application works with clips: virtual representations of (parts of) the video files that exist on your preferred type of storage. Getting footage into your project (“ingest”) will create these clips in your project. Most apps will offer several options to do this:
-
Creating links to the original video files, wherever these may reside (on your computer, external storage, network storage or in the cloud).
-
Copying your files to a dedicated folder managed by the application (this could again be on local or network storage). Importing to a dedicated application folder is very useful for feature film editing and TV production, but is less common elsewhere in the media industry. Its strong point is that when your media is managed by the application, you won’t have to re-link files when moving to a different editing station.
-
Optionally, files can be transcoded during import. New media files will be created in either the app’s dedicated folder or to a user specified location. The transcoded files will be much more optimised for editing, resulting in better playback performance.
The latter is part of what is known as the offline-online workflow, in which you work with optimised files, and once an edit is finished (“picture lock”), the clips on the timeline will be exchanged with clips that link to the original camera files. Often, after colour grading in an external application, all colour graded shots are rendered with their colour corrections and placed back onto the timeline in the NLE.
A specific type of offline-online workflow is the proxy workflow, that allows switching on-the-fly between the proxy files and the original camera files and will ensure that exports of your video will use these original camera files when rendering. When using a proxy workflow, you can either create optimised files inside the application itself (or in Premiere’s case, via Adobe Media Encoder) or attach existing proxy files that were created by a third party application or by the camera during recording.
After importing media and possibly creating/attaching proxies, clip attributes might need altering. You might need to change incorrectly determined frame rates or, more commonly, change the audio channel mapping of your clips (e.g. setup clips with two audio channels as dual mono instead of stereo).
Clip types
We usually find the following types of clips in NLE’s:
- Source clips
-
they represent media files (containing video and/or audio streams) to its full extent, and for other types of media (most notably still images) — these usually get a default duration upon import.
- Subclips
-
they represent a portion of a video or audio file.
- Timeline clips
-
duplicates of source clips that only exist within a timeline. Properties of these clips can often be altered without altering the same properties of the source clip.
- Compound clips/nested sequences
-
these are in fact (sub)timelines that can contain any number of tracks and clips.
- Multicam clips
-
(group clips in Avid), these are compound clips, in which multiple clips are synchronised and combined into one. This compound contains clips with different camera angles (for video) or audio recordings for the same event.
- Filler (Avid), FX clips (Lightworks) or Adjustment Clips (Premiere, Resolve)
-
these special clips can hold effects that are applied to all clips on lower tracks of a timeline, directly underneath.
Bin types
Often there are two types of bins in which these clips sit
-
“Normal” bins.
-
Search bins (Premiere) / filters (Lightworks) / smart bins (Resolve) / smart collections (FCP): for these you setup certain rules based on clip names or metadata. All clips to which these rules apply are automatically added to these bins. This means that the same clip can simultaneously exist in a regular bin and a search bin, in contrast to normal bins, where each clip will only exist in a single bin and you’d have to duplicate this clip for it to be also placed in another bin (Lightworks being the exception here).
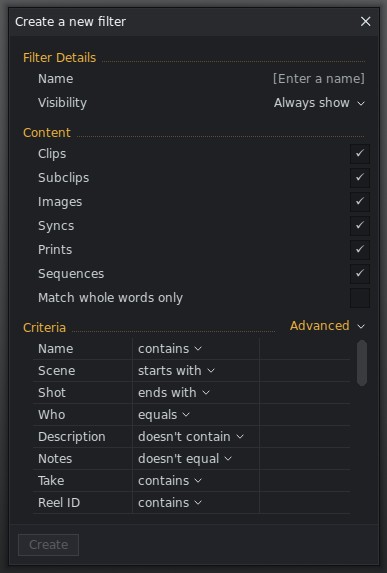
Figure 3. Filter options in Lightworks
Resolve adds a third kind of bins, known as “Power bins”: these are bins that are accessible by all projects.
Bin views
Bins offer several views to see its contents. These include:
-
List View / Text View: all items in the bin are listed vertically. Multiple columns will show different kinds of metadata — the user can choose which fields are displayed and can rearrange their order.
-
Icon View (Premiere) / Frame View (Avid) / Thumbnail View (Resolve) / Tile View (Lightworks): this will show a small frame from each clip in a raster. In general you’re able to change which frame is displayed if you wish to see another.
-
Freeform View (Premiere): same as Icon View, but you can freely position the clips wherever you want. Note that Avid and Lightworks allow you to do this within Icon/Frame View itself.
-
Script View (Avid): similar to Text View, but with a frame being displayed for each clip and a large field for entering comments. In Script View, the vertical order of clips can be rearranged, in contrast to Text View, which only supports automatic sorting.
-
Metadata View (Resolve): similar to Avid’s Script View, except you can’t reorder clips.
-
Filmstrip View (Final Cut Pro): similar to Icon View, but TODO: missing text??
Avid is famous for allowing you to save your Text or Script View configuration as a preset that can be quickly recalled. Premiere allows this through its Metadata Display window, Final Cut Pro by Control+left clicking any column header and Lightworks via the Columns > Presets menu, but these methods are less straightforward than Avid’s. Another neat feature that Avid has is a bin map: an overview of bin contents that can be toggled when in Frame View.

Figure 4. Creating a custom view preset in Avid Media Composer, which can be selected from the drop-down menu in the top bar.
Note that all apps offer a search/filter box (or button) on top of each bin view. Final Cut Pro and Resolve allow skimming clips from the bin view, simply by hovering the mouse on top of the thumbnail and moving it from left to right.
Organising footage
Once your footage is represented by clips in bins, organisation can begin. Wildly different methods exist for this. In the simplest version you will just drop your footage in one or several bins and be done with it. In professional environments there are often strict bin structures and naming conventions, and additional methods for organising are being used:
-
First and foremost: with multi-camera shoots and/or when audio has been recorded separately, now is the time to synchronise these. Create multicam clips and/or synchronise sound, either in the NLE itself, or in an external application. I personally create source reels first (see further down this list), export these to another application for syncing, import the synced reel back, and in case of a multicam shoot, split this reel into multiple reels and convert each to a multicam clip (Premiere and Resolve both support this).
-
Metadata. This is a very powerful way to search for or filter specific types of content and it could be a chapter on its own. Metadata is often created by the camera during recording, added during offloading by a DIT (digital imaging technician) or applied after ingest by assistant editors. Nowadays metadata is also added by AI/machine learning algorithms to help identify the contents of a clip, create transcriptions from audio, etc. Avid provides the option to (automatically or manually) connect clips to lines in a script (ScriptSync).
-
The aforementioned subclips are often used to extract sections out of a longer clip.
-
Sequence/timeline markers to mark points in time, or sections (so-called ranged or spanned markers; terminology is different per app).
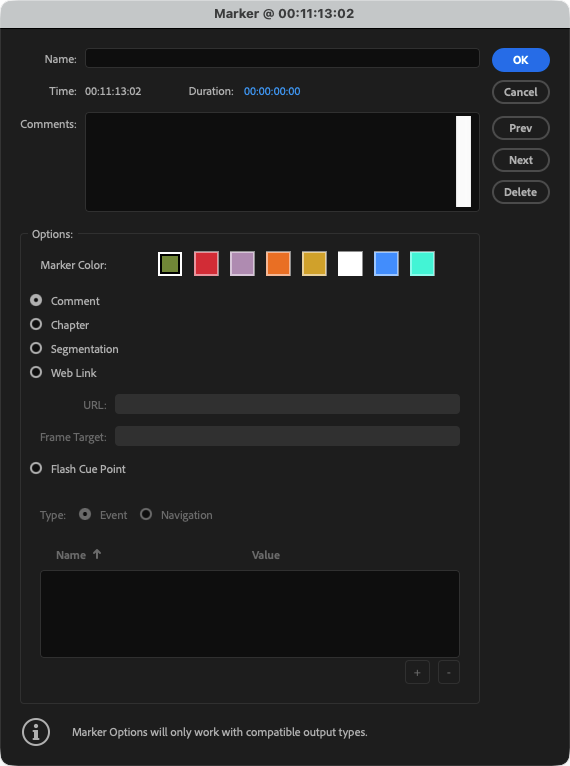 Figure 5. Plenty of marker options in Adobe Premiere
 -
Timeline clip notes (Avid): these can be added to a timeline clip, and will stay connected to this clip. You can’t trim them off and they will automatically move whenever a clip moves. They can be burned into a render upon export. Premiere and Resolve offer clip markers instead — these are similar to sequence markers, but are attached to clips.
-
Tagging or rating (parts of) clips (FCP and to a lesser extent Resolve). FCP’s rating only goes as far as letting you mark clips or sections as “favourite” or reject clips entirely, but its keyword system (as described later in this chapter) is much more elaborate and useful. Resolve has an option to add keywords, but its workflow is quite clunky when trying to apply this to a section within a clip.
-
Clip colours. Often there exist multiple levels at which a clip can get a colour. Colours can be applied based on source clip (usually different colours for different media types), timeline clip, timeline track, offline footage, different framerates, and more. Avid has the most options in this field and lets you choose exactly which types of colours to display on the timeline. Manually set clip colours are a very useful organisational tool, e.g. to differentiate between several cameras, interviewed persons in a documentary or different locations.
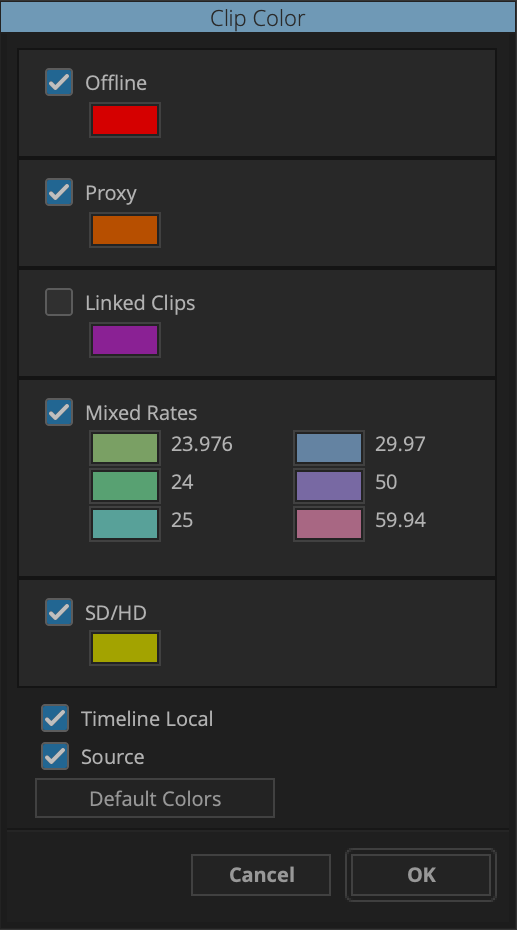 Figure 6. Avid has many options for choosing how clips are coloured in the timeline
 -
Flags (Resolve). Similar to markers, but these apply to entire (source) clips, while markers apply to a single point in time or a time range within a clip. Multiple flags can be added to each source clip.
-
Reels: source footage is divided over one or multiple timelines to be able to quickly navigate many clips without having to load individual clips in the source viewer. These are called “source reels”. A special kind of source reel is a “sync map”, which contains all footage of a day of shooting from multiple cameras synced and laid out chronologically. FCP doesn’t quite support source reels and instead offers continuous playback from the browser window. Resolve has a “source tape” option that works in a similar way.
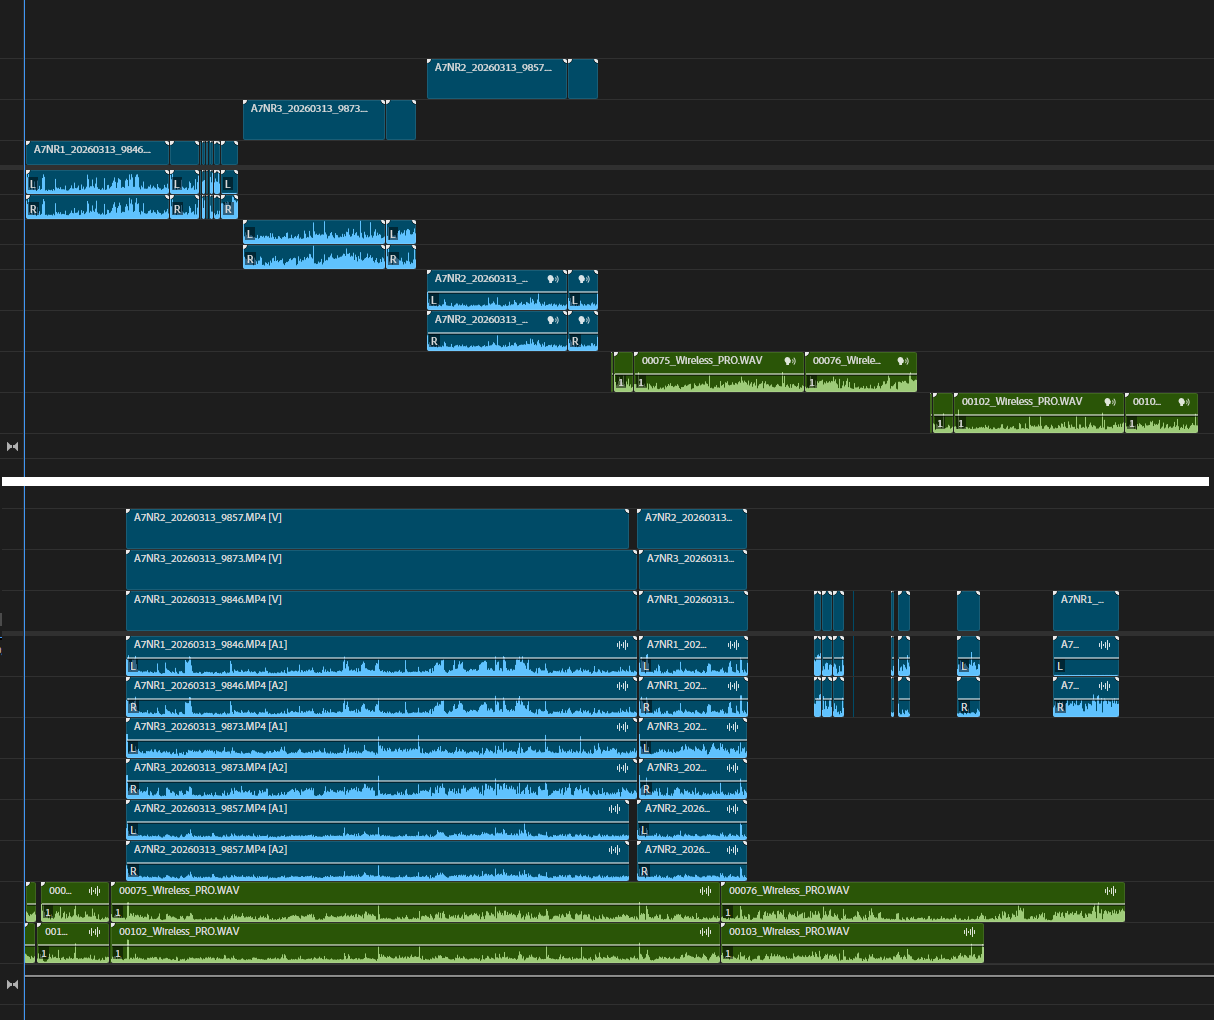
Figure 7. Simple example of a source reel (top), converted to a sync map (bottom)
Viewing footage
Once basic organisation is in place, the editor can start watching and adding further notes/comments to narrow down large amounts of footage and seek out options of useful content for the edit. Most apps offer two types of monitors for video playback: source and record/program monitors. FCP has only a single monitor that switches between these two functions. Some others (Avid, Resolve) give users the choice between single or multi viewer modes. Lightworks and Avid support an unlimited amount of floating viewers.
Figure 8. You can open (and position) as many viewers as you like in Lightworks
Viewers are usually coupled with timecode display and have a ton of settings. I won’t go into details about these.
In most applications you can also watch your source footage from the bin when in Frame/Icon View. You’ll be able to use JKL shortcuts for playback, mark in and out points and add it to the timeline, similar as to when the clip is loaded in the source viewer. Final Cut Pro lets you click and drag in-out regions in the thumbnail.
Selects
Time to create a selection of material to consider for the rough cut. One way to do this, as previously described, is by creating subclips or by tagging. Drop the subclips in a bin in Icon / Frame View and you have a good visual overview of selected shots. This is great for selecting B-roll material, or for projects that require a very visual approach, f.e. trailers, music videos or aftermovies (not hoping to ever cut one of those again though, but that’s a different story 😉).
Another way to select footage is to cut selections from source clips or source reels to one or more selects reels: these are timelines that hold your selections and are only used for that purpose. Selects reels can then be loaded again as if they were a source clip, in order for an another selection to be made. This is called reel-to-reel editing. Many apps allow seeing the source timeline, either in their own panel (Premiere) or window (Lightworks), or by switching the timeline panel between a source and record mode (Avid, Resolve). A method known as pancake timeline editing works when an application supports viewing multiple timelines simultaneously. By stacking timelines above each other you can easily drag selections from one timeline to another. This is possible in Premiere, Lightworks and Resolve.
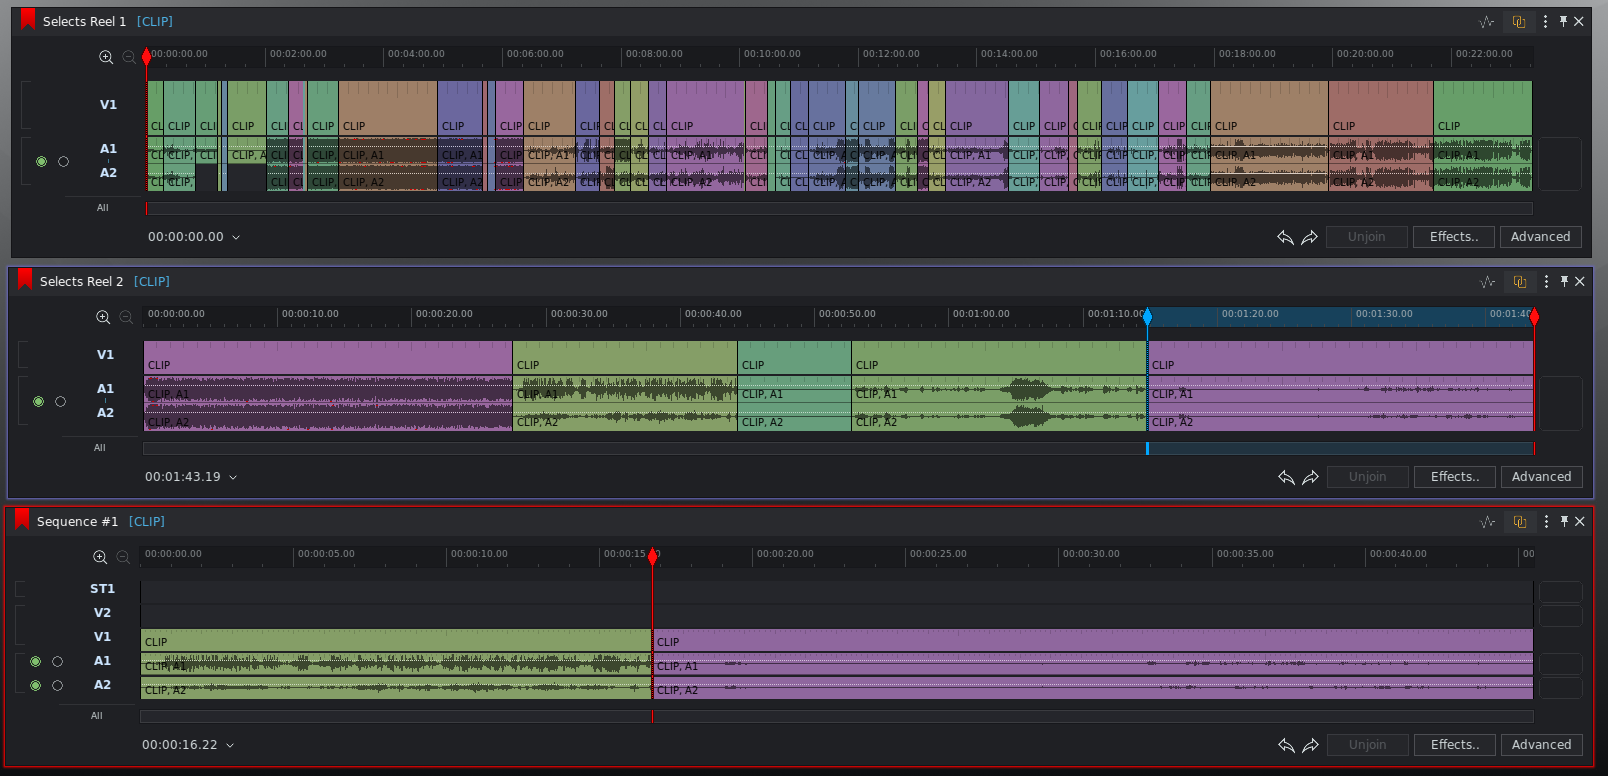
Figure 9. Pancake timeline editing in Lightworks
Reels can be further managed by using markers to describe certain points in time or sections, and these markers can be viewed as a list in their own panel. When selecting a marker in this panel, the playhead of the corresponding monitor will jump to the (start) frame of this marker. Markers can have multiple input fields and a colour. They are one of the most important tools to be able to make notes and navigate large amounts of footage over extended periods of time. As an aside: Lightworks has an option to turn ranged markers into subclips, quite useful, as it allows you to use markers to make your selection.
Some NLE’s have a “ripple markers” option for timeline markers. This means markers will move when clips in the timeline are shortened or extended.
FCP has “todo markers” that can be checked. And when tagging clips with keywords in FCP, keyword collections are automatically created in which all sections of clips with the same keyword can be found. It’s also possible to manually create keyword collections and drag and drop clips or tagged sections (“content ranges”) there.
Back to the reels: one advantage of reel-to-reel editing is that it’s very useful to see the audio waveforms of your source clips on an actual timeline: this way you can freely zoom and scroll. Final Cut Pro will only display a clip’s waveform at the bottom of the clip preview in the browser, but when an interview is an hour or longer, this waveform will be squeezed in a way that’s of little use.
Another advantage of reel-to-reel editing is a sense of space: you get an idea of where certain footage can be found (more to the left, in the middle, or at the end of a reel). Combined with markers, clip colours and gaps between sections, this makes it easier to find things back later. A third advantage is that it’s easy to filter in rounds: you can narrow down your footage in multiple reel-to-reel selection passes.
I personally often use a variation of reel-to-reel editing, in which I lift sections in my source reel. I then duplicate this reel, remove the first video and audio track(s) and keep the lifted parts to create my selects reel. The advantage here is that I can rate sections as not useful (V1), possibly useful (V2), quite useful (V3) or highly useful (V4) by lifting the video clip one, two or three tracks up — see it as a 4-star rating system. I have seen other editors use this method for selecting footage, although in all fairness I’m not sure how widespread this technique is.
Figure 10. Lifting selections; also note the use of clip colours, gaps and markers for organising the selects reel.
In FCP you can create your own rating system by using keywords (as shown in the screenshot at the start of this chapter) and then having everything filtered through keyword collections, as described in this blog post at Frame.io. Quite handy as well!
Proposals
-
Which system(s) of organising a project and selecting footage should Lumiera support? I would say: most. They don’t interfere with each other, so let the user choose. Definitely support source timelines and let people rate, tag and mark all they want. Subclips might not be necessary when a tagging/keyword system is present, as Final Cut has proven.
-
Metadata-based organising, searching and filtering of content are must-haves.
-
I would include a native rating system (1 to 5 stars should suffice) that works both on clip sections and entire clips, rather than FCP’s favourite/reject system, as it’s more granular.
-
As for bins-in-bins vs bins-in-folders: the first one is more flexible (bins can contain both media files and other bins, while folders can only contain bins) and more closely resembles how folders work on a PC, so my preference would be to go that route, although there’s also something to be said for the strict division of function that folders+bins have.
-
I would like to propose an option to automatically create source reels based on rules you can set, for example: one source reel for every day of shooting. These automatic source reels could have a filter function to select which clips are being displayed on the timeline. This way it becomes easy to say something like “show me all clips from the second day of the shoot from camera A”.
-
A versioning system for timelines is something that only Resolve has recently picked up with its Create (and Restore) Timeline Backup feature, and honestly I’ve been amazed by how this hasn’t been a core feature in NLE’s for decades now, as it makes so much sense to have. Let users make snapshots and perhaps make one automatically every day, without the need to manually duplicate and rename timelines and putting them in some sort of archive bin.
-
Importing: auto-import based on watch folders could be very useful during certain stages of an edit. Setup which folders to watch and whenever a new file is dropped in that folder it will be imported into a bin of choice. Especially handy when working with sound effects. However, we might not want to be scanning folders all the time.
-
About sound effects: there’s a free application called Metadigger that let’s you quickly filter your sound collection by metadata and then copy sound files to your project folder with a keyboard shortcut. Something like this, built-in, would be quite handy for those of us with local sound effect libraries.
-
A small one: I’d like each project to remember the last location you imported from. I often switch between projects and each time I want to import something in current NLE’s, the file dialog points to the last used directory, which is often the wrong one. Not a big deal, but not ideal either.
Chapter 2: the timeline
The timeline is the core of the editing application. This is the editor’s canvas: the space where the actual film or video is constructed, or rather: crafted. Therefore it is of the highest importance for Lumiera to feature a timeline that takes the best of what current NLE’s have to offer, while thinking carefully on how we can improve upon these ways of working. There are many different aspects to working in the timeline which I will explore in the different subsections of this chapter.
Tracks vs trackless
In general, we can observe two extremes when it comes to editing:
-
On the one hand, there are NLE’s modelled to resemble working with analogue gear (i.e. classic editing stations from KEM, Steenbeck, Moviola). A lot of terminology in editing software (“bins”, “reels”, “cut”, “mark in/out”, among many others) stems from the analogue origins of editing. Lightworks is an example of this. When trimming you “unjoin” a cut, make changes, and then “join” the cut again, as if working with analogue film that needs to be taped together. It works best in conjunction with the Lightworks Console, a hardware device that was designed specifically to make software editing feel as if editing analogue film. Very hands-on, very tactile, according to editors who have worked with these consoles (unfortunately I haven’t had a chance to try this myself).
Not just Lightworks, but also Avid is said to have been greatly influenced by analogue equipment, and Adobe Premiere’s predecessor ReelTime was created to work like 3/4" tape decks. Blackmagic’s Speed Editor (and corresponding Cut Page in Resolve) has also been designed according to this principle: to make editing feel like you’re operating a machine. Pressing buttons, rotating dials. This has a great feel to it, but it’s less flexible than the other extreme:
-
Editing and trimming designed to be performed by mouse. Most NLE’s added this earlier or later during their development. Final Cut Pro was from its core designed to be used this way. It’s fast, and in combination with the clip connections and magnetic timeline, it’s the least destructive way to edit. Trimming and editing by mouse is less precise though, which is why even FCP offers many keyboard shortcuts for precise trimming by keyboard. Using a mouse feels slightly less tactile than using physical buttons and dials.
In this same category we can also mention touch screens (as they offer similar interactions as a mouse, with the addition of finger gestures). Editing on a smartphone or tablet, when not using a pen, feels even further removed from giving you a physical connection between your hands and the buttons on the screen.
Because of its analogue roots, traditionally, NLE’s have been track-based. I’d like to quote Randy Ubillos, original creator of ReelTime and Final Cut Pro:
“In a track based system the layers at the beginning, middle and end all share the exact same tracks and you’re always potentially disrupting things in other parts of the project when you make changes in another area. One of the most common things I heard from editors was that as a project progressed the likelihood of a change in one part of a project having an unintended effect somewhere else in the timeline went up dramatically. Tracks implicitly put a relationship between all of the items in that track, even though they may be actually completely unrelated.”
Source: Interview with Randy Ubillos
Tracks have several advantages:
-
They give us a way to organise our timeline by dedicating certain types of clips to certain tracks.
-
For example:
-
Interview shots on V1
-
B-roll on V2
-
Graphics on V3
-
-
Or for audio:
-
Dialog on A1 + A2
-
Music on A3 + A4
-
Sound effects on A5-A8
-
-
-
They allow for track-based effects (usually only implemented on the audio side).
-
They support editing by keyboard, as you can toggle tracks on and off and bind this to keys.
Tracks have disadvantages as well:
-
They’re quite inflexible: you can’t easily change their order.
-
As we saw in Randy’s quote, later in the editing process, when timelines become more complex, it’s easy to mess things up. Often not all tracks are visible within the viewport and therefore you will need to remember its state (enabled/disabled/sync locked) and contents or else a trim operation might throw things out of sync, or you might accidentally overwrite clips. Similar issues can happen horizontally. In Avid for example, I’ve seen people make an entire row of empty cuts at the end of their timeline, simply so they can check later if anything was accidentally thrown out of sync. Lightworks has out-of-sync indicators to mitigate sync issues.
-
Clips that naturally belong together are separated, for example b-roll and associated sound effects. Instead, clips that only share a shallow relation are grouped together.
-
To me, personally, track management (i.e. the enabling and disabling of tracks and/or sync locks in order to get a certain result when performing editing operations) takes me out of my storytelling flow. It’s a necessity that doesn’t directly aid in the creative process.
Editors often proudly share screenshots of their timelines on social media, and they do look impressive, but these are in fact pretty fragile structures.
Figure 11. One of my own timelines, which is relatively simple by comparison to those of many Hollywood movies
So naturally, a question would be: what will happen if we would let go of the track paradigm? This is what Final Cut Pro has done, starting from the rewrite of Final Cut Pro X. At the time, a disastrous marketing campaign caused many editors to leave the application, although more and more people are starting to realise that many of its ideas were way ahead of its time. It’s still the only big NLE out there that was designed with computers in mind, and not analogue hardware.
It’s not entirely trackless, but it manages to hide the concept of tracks from the user. There are no buttons to enable or disable tracks or other track controls, and instead, the tracks are called “layers”. In a nutshell, it works by having a primary storyline (in a track-based NLE this would be V1+A1) where you build the foundation of your edit. Then the video clips you put on top and the audio clips you put below get connected to one or more clips from the primary storyline. Move a clip on the primary storyline, and all connected clips automatically move with it. With a modifier key you can ignore clip connections, so that you can also easily move a primary clip elsewhere without its connected siblings coming along.
Figure 12. Extending one clip will automatically move all connected clips in order to keep sync
Sounds good. Why not just copy this? One reason is that FCP assumes that all clips that are not on the primary storyline should be connected to this primary storyline. This might work well for fiction films, but not necessarily for other types of video. Earlier I mentioned an example of sound effects that share a connection to b-roll on a higher layer. FCP won’t allow you to connect them. Another limitation of FCP is that it’s primarily designed to be operated by mouse. It’s not possible to use keyboard commands to, for example, swap the position of clips (other than by cut and paste), or to perform slip edits (the trim keys will work, but the clip needs to be selected by mouse using the Trim tool).
How else could we group clips together that ought to be connected?
We could create groups that are directly editable, like so:
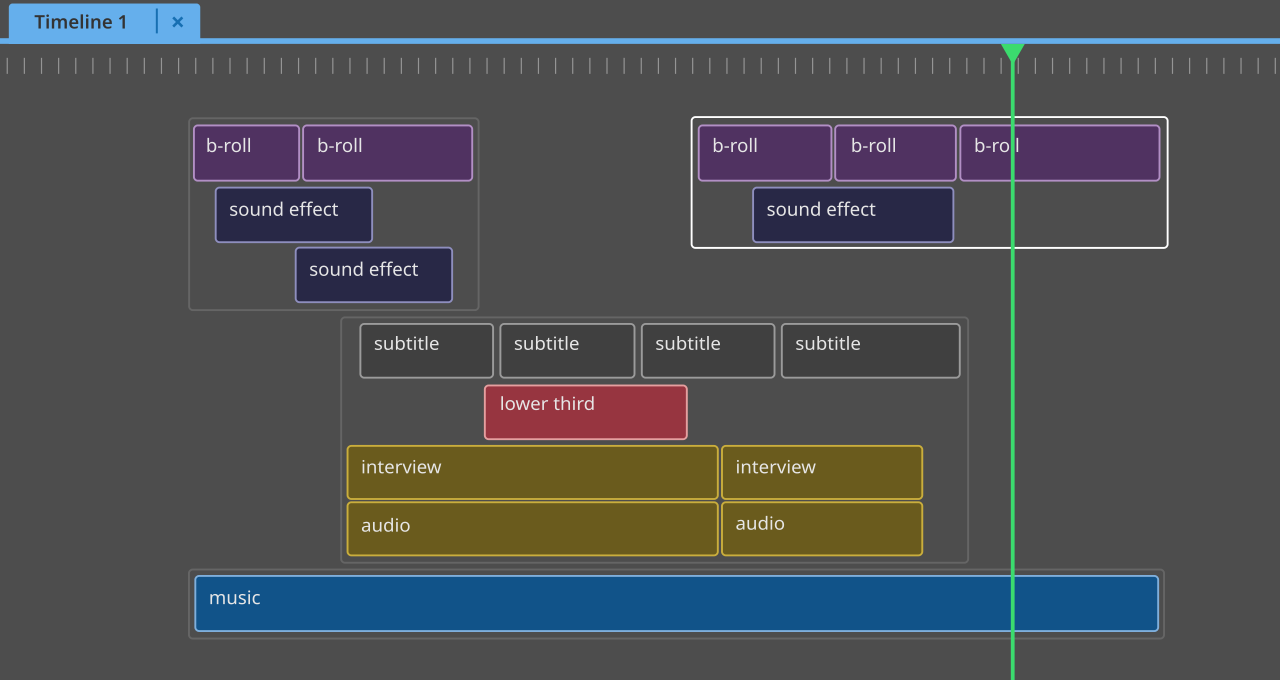
Figure 13. Compound clips
However, there are a few problems with this: we expect rendering to happen from top to bottom, in which case the b-roll would cover the subtitles. On top of that, it’s hard to see at which points video clips overlap. Last but not least: it looks rather unorganised.
Can we restructure this? Perhaps like this:
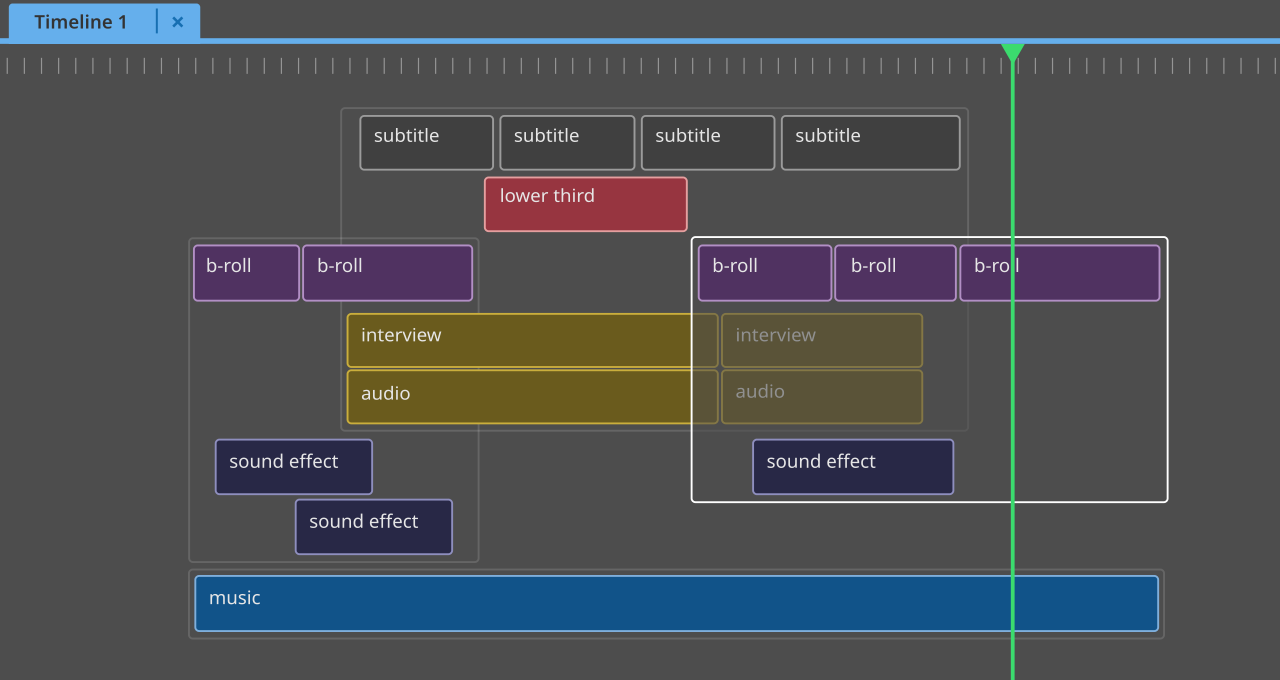
Figure 14. Overlapping compound clips
But how exactly would a user interact with a timeline like this? I will leave the answer to that question for an actual design document, as for now I just wanted to show the concept of grouping so that it becomes clear that alternative ways to organise the timeline might be of great value.
Tools + modes + views
If we observe existing NLE’s, we can distinguish several ways to change timeline interactions. Some use a tool-based approach (Adobe Premiere, Final Cut Pro), others a mode-based approach (Avid Media Composer, Lightworks and DaVinci Resolve), and we can also see a view-based approach (FCP’s use of the precision editor, explained in more detail later). Which of these interaction methods would be preferred for Lumiera?
-
Using modes is somewhat controversial, as it increases cognitive load (the user needs to remember which mode they’re in) and can lead to user errors (an action in one mode might do something different than intended in another mode). Another thing about modes is that they require a user action for entering and exiting.
-
A tool-based approach however, is very mouse-centred. It changes the behaviour of the mouse, not of keyboard actions, and this change is visible in the cursor. Tools are of little use to the keyboard editor.
-
A view-based approach is not too different from using modes, with the difference that it drastically alters the contents of a view or panel in the user interface. It’s less common and can be seen in FCP’s precision editor. It doesn’t change the working of keyboard shortcuts or the mouse and it alters the timeline via animations in a very fluid way.
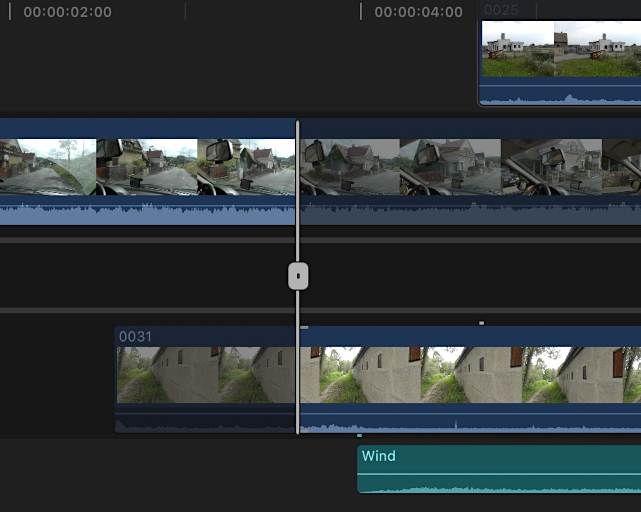
Figure 15. Final Cut Pro’s precision editor
Another example is the Trim View in DaVinci Resolve: whenever you perform a trimming operation, the program monitor displays a trim view (showing the frames left and right of the cut next to each other). As soon as you start doing something else, it exits this trim view. It needs no dedicated user action.
This might seem like a great approach (and can be combined with tools and/or modes), but it does mean a user needs to reorient a bit when they exit the altered view and return to its default state. Perhaps that’s a small price to pay, when not overdone.
When we more closely examine the behaviour of NLE’s, we see that things are not as black and white as they seem. No NLE exclusively uses one method over others. Resolve’s modes do in fact also change the mouse cursor’s look and behaviour and can therefore be considered a hybrid mode/tool system. FCP’s Select and Position tools also change the behaviour of trimming keys and can therefore indeed also be considered modes, which gives us a hybrid design as well. Specialised views can be combined with tools or modes.
To conclude: all methods have pros and cons. Tools, modes and views aren’t mutually exclusive, so I think we should use whichever method or combination of methods is appropriate for different actions in Lumiera. Whenever we can, we should try to avoid all three and design the app to be as consistent as possible. Whenever we use a mode, we should see if we can design it in a way in which a user fluidly enters and exits this mode, without requiring extra actions: contextual modes. Most mode-based NLE’s already implement this for their trim mode in a way where selecting a trim side automatically enters trim mode. However, a user does still need to explicitly exit trim mode.
Regardless of the method, immediate visual differentiation of tools/modes/views is important and I’d like this to extend to any timeline option that can be toggled on/off. Therefore I’d like to propose the use of a contextual bar that appears over the bottom part of the timeline whenever a contextual mode is active.
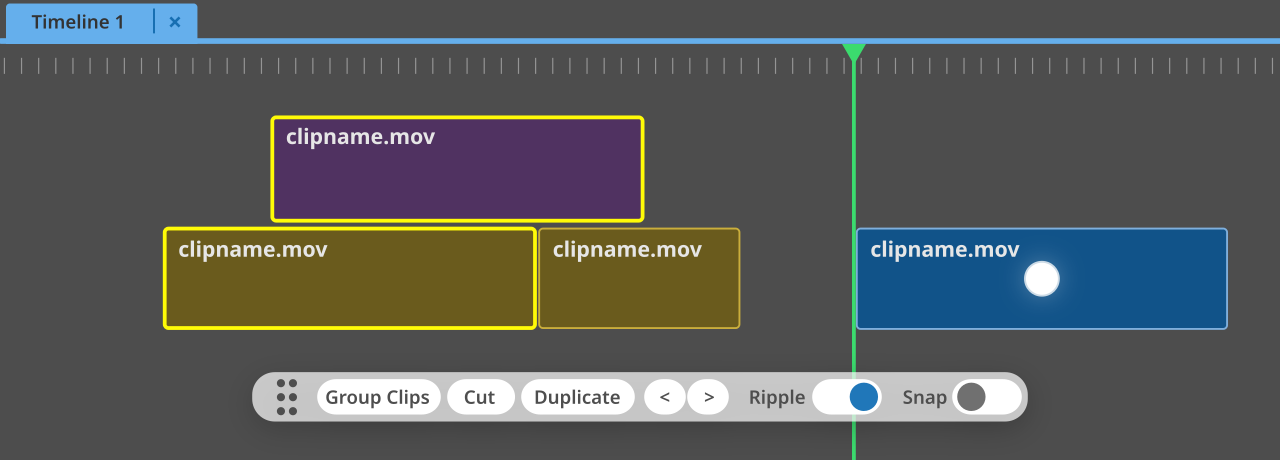
Figure 16. Contextual bar with options for the mode/tool
Currently I’m thinking of using this bar on two or three occasions:
-
When selecting clips. It can feature:
-
a Group Clips button
-
a Cut button
-
a Duplicate button
-
a Nudge Left < button
-
a Nudge Right > button
-
a Ripple toggle
-
a Snap toggle
-
-
When trimming. It can feature:
-
a Trim radio button
-
a Slip radio button
-
a Slide radio button
-
a Trim Left < button
-
a Trim Right > button
-
a Ripple Trim toggle
-
-
When adding clips to the timeline.
It can feature options like Insert, Overwrite, Replace, etc.
→ See the next subchapter: »Adding clips to the timeline«.
Colours could be used (for example as an outline around the bar) to indicate which contextual mode is active.
A limitation of such a bar is that it might overlap with content that a user wishes to interact with. If this is the case, then clicking on the grid with dots will let a user drag this bar out of the way. As an extra option I would like to suggest to use a modifier key (Ctrl?) which temporarily hides the contextual bar. Another consideration could be to attach this bar to the bottom of the timeline and combine it with the zoom and navigation sliders, although I feel a more central default position will get things done quicker.
Adding clips to the timeline
All NLE’s offer multiple ways to get your material in the timeline, and those methods fall into the following categories:
-
Drag and drop from either the project contents panel, another timeline, or directly from a file browser
-
By creating a timeline out of selected clips in a bin
-
N point editing, of which the most commonly used is three point editing: you load a source clip (or timeline) into a (source) viewer/monitor, mark an in point, out point and use one of multiple options (by clicking their buttons, by pressing the corresponding keyboard shortcut, or by dragging your clip from the source viewer into the program monitor onto a list of zones), of which the most common ones are:
-
Insert (based on playhead position)
-
Overwrite (based on playhead position)
-
Place on top (based on playhead position)
-
Append (added to the end of the timeline)
Three point editing also works by only providing an in-point on the source clip, and marking in and out points on the timeline. In order to choose on which tracks your clips end up, track-based NLE’s usually provide a way to route source tracks to timeline tracks via the track header.
Some NLE’s support four point editing, where speed adjustments are applied to make the selected duration in the source clip match the selected duration in the timeline.
-
-
Avid features a Replace Edit option: a selected clip on the timeline can be replaced by the contents in the source browser with a single click or keystroke.
All of these options make sense, but in general I rarely remember more than two options (insert and overwrite) and easily forget any surplus options that NLE’s offer. We should also try to limit the amount of keyboard shortcuts that a user needs to memorise, so I would like to propose a single “Add Clip” action. This will insert a clip and will show the different options via the contextual bar. You can then change the desired method after the fact, until you commit by doing something else. In this case, adding a clip will enter and exit another contextual mode. One last thing I would like to address is the destruction that an insert operation can cause. Usually this can be prevented by proper track management, but you can wonder why you would ever want an insert action to cause the following:


Figure 17. Inserting a clip with sync locks enabled for V2 might split a clip in Avid Media Composer.
In this case, if you’d like the clips on V2 to stay in sync, the overlapping clip will be split in two. If you don’t want this to happen you would have to move the overlapping clip to another track temporarily, or move everything on V2 by hand with the same amount of frames as the duration of the clips that’s inserted. My point is, however, that while the behaviour above makes sense when you strictly follow the logic of how such a timeline works, in real-life you would rarely want a clip to be split only to keep sync. Therefore, I would like to propose insert operations to be nondestructive by nature. Overlapping clips on other tracks or layers will simply move in its entirety.
Another thing to consider, as I put much emphasis on grouping (or linking) clips, is that we might want to differentiate between inserting a clip into the currently active group, or inserting it in a newly created group. This way a clip will always end up in a group without much manual work.
Navigating the timeline
Quick timeline navigation is key in editing. Let’s start by examining how other NLE’s deal with this. We need to make a distinction between:
-
Moving the viewport: the visible section of the timeline.
-
Moving the playhead (which will ultimately also move the viewport, once the playhead goes offscreen).
Moving the viewport, by mouse:
-
This usually happens by dragging scrollbars.
-
In pretty much every application the scrollwheel can be used to scroll either horizontally or vertically (usually a setting defines the default direction, and the other direction can be toggled with a modifier key).
-
DaVinci Resolve allows moving the viewport by middle mouse dragging. Quite useful, actually.
Moving the viewport, by keyboard:
-
Some apps use Page Up/Down for this (i.e. Premiere).
-
Resolve scrolls the timeline vertically with Page Up and Down and supports shortcuts for Previous/Next Timeline Page.
Moving the viewport, by other device:
-
I don’t recall having seen this option anywhere.
Moving the playhead, by mouse:
-
Avid allows doing this by clicking anywhere in the timeline (as long as the smart tools are disabled, else you need to click in empty areas).
-
FCP skims the timeline by default when moving the mouse. Clicking parks the playhead in a new location.
-
Others require clicking in the ruler above the timeline or dragging the actual playhead.
-
The playhead will obviously also move during playback, which can be started and stopped by clicking buttons underneath viewers or above the timeline.
Moving the playhead, by keyboard:
-
Through playback, using j/k/l as a shuttle (repeated taps increase playback speed).
-
Most apps provide keyboard shortcuts for moving single frames left and right.
-
Most apps provide keyboard shortcuts for moving steps of multiple frames left and right (in Premiere you can choose how large the steps are, Resolve only supports single seconds).
-
Most apps provide keyboard shortcuts for going to the previous or next cut.
-
Most apps provide keyboard shortcuts for going to the previous or next marker.
-
Most apps will use the Home and End keys to move to the start and end of the timeline.
-
Most apps provide keyboard shortcuts for going to the previous or next keyframe.
-
Most apps provide ways for typing timecodes.
Combining mouse and keyboard:
-
Adobe Premiere and several DAWs (Ardour, Reaper) have a “move playhead to cursor” feature that can be bound to a key. Very useful! Resolve has added this in version 20.1 as well.
Using other devices:
-
Shuttle: allows controlling playback speeds and direction depending on how far you turn the dial left or right.
-
Jog wheel: allows stepping left or right, frame by frame.
-
Blackmagic’s Speed Editor has the option to change the function of its wheel between shuttle, jog and scroll. The shuttle mode is practically unusable, but jog and scroll provide amazingly fluid ways to navigate the timeline. Especially in combination with markers and jumping between these by keyboard shortcuts, this is a wonderful way to work.
Zooming also needs to be mentioned here, because often we might be zoomed in, do some work, zoom out to get an overview of the timeline, and zoom in to another part of the timeline. Zooming in and out, by mouse:
-
Usually done either by using a zoom tool,
-
Or by using zoom sliders.
Zooming in and out, by keyboard:
-
Every NLE has keys to zoom in and out horizontally. Some (Premiere, Resolve, Avid) support keys to expand and shrink all track heights at once (vertical zooming).
Navigating with keyboard shortcuts
I can imagine that all of the keyboard shortcuts for navigation were invented simply to provide many options for each editor to choose what they need. This way, every editor can pick the shortcuts that best fit their workflow.
Navigation by means of keyboard has very good support in most apps and it’s a matter of providing similar shortcuts in Lumiera. It could be expanded by allowing the creation of navigation markers (a special category of markers) that are bound to keys or numbers. A user can jump to specific markers by pressing a “go to navigation marker” key, followed by the key they bound. This is basically Vim’s way of doing it (m+0-9a-zA-Z to bind, backtick+0-9a-zA-Z to jump). Or we might want to keep it as simple as having the regular “add marker”, “add and edit marker” and “go to next/previous marker” keyboard shortcuts.
Sections (explained later in this chapter) will get navigation markers automatically, so a user doesn’t have to create each marker manually. Or we might want to include keyboard shortcuts for “go to previous/next section”.
Fast forward and fast rewind keys as found in Reaper might be a helpful addition to the aforementioned keys. This would give as a quick way to skim a timeline by keyboard. While fast forward and rewind can be achieved by the regular j/k/l shuttle controls, this requires a lot of tapping to get to the desired speed, over and over again.
About mouse navigation
Scrollbars and zoom sliders have a different set of reasons for being chosen as the de facto standard widgets for navigation. Familiarity on the one hand, and visibility on the other. By having these controls visible at all times, yet outside of the working area itself, each user will be able to locate them while they remain out of the way. These are very good reasons for their existence and positioning, but they come at the cost of speed: moving your mouse cursor out of your main working area towards the edges and back takes time and interrupts the creative flow. It works, but it’s not ideal. That’s why I would like to propose an additional way to navigate by mouse, which is by popup widgets. These will pop up around the cursor, triggered by a keyboard press (similar to how Blender uses pie menus):
- Skim widget
-
by moving the mouse in a small bar we can quickly skim the entire timeline. This will move both the viewport and playhead. Clicking the left mouse button will accept the new position and close the widget.
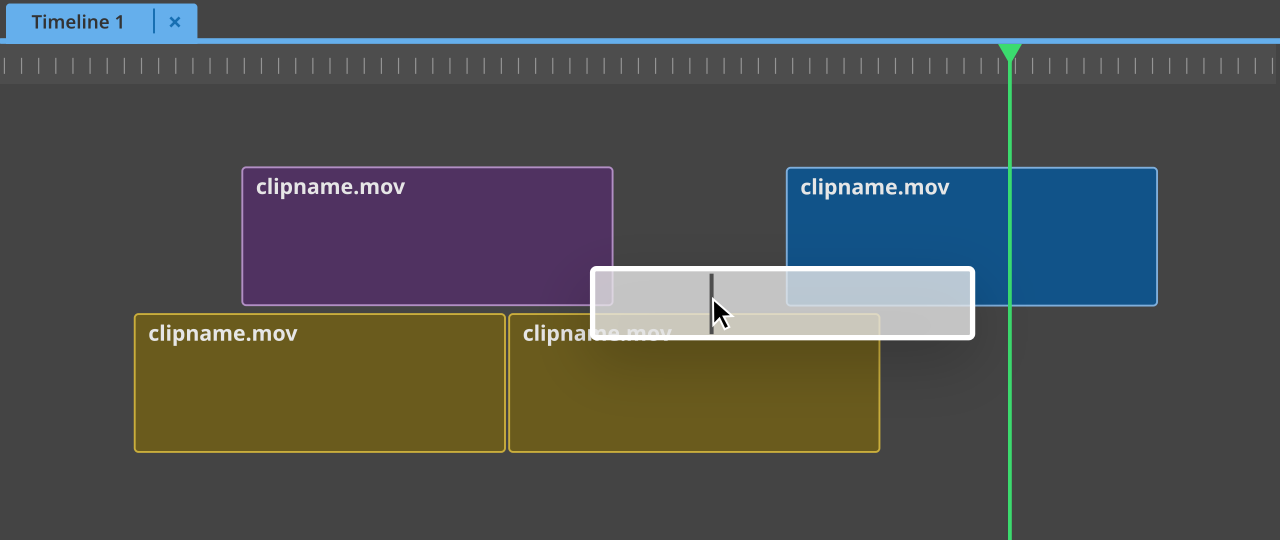 Figure 18. Skim widget
 - Autoscroll widget
-
when the user moves the mouse cursor slightly left or right, it will enter zones in which the timeline view will scroll left or right (much like the autoscroll feature in Firefox). When the user moves the mouse farther away from the initial starting point, the scrollspeed will increase. This will also work vertically. The playhead will move along as well.
 Figure 19. Autoscroll widget
 - Zoom widget
-
moving the mouse left or right from the centre will zoom horizontally, up and down will zoom vertically.
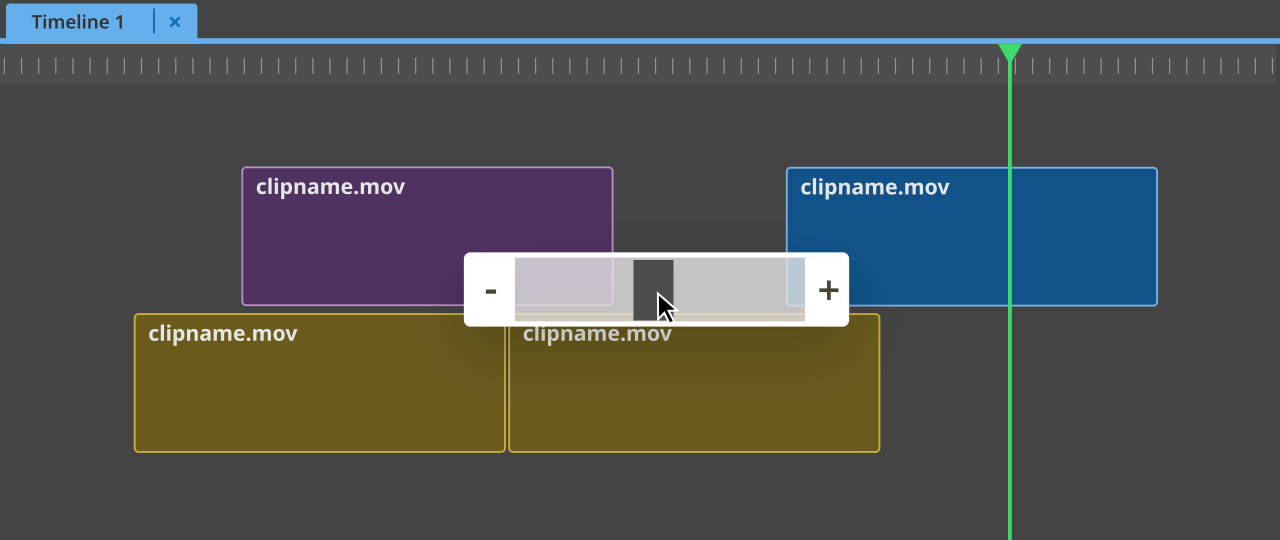 Figure 20. Zoom widget
Mouse-only navigation:
- Combined widget
-
we could make a widget that combines skimming, autoscroll (only horizontally) and zooming (horizontally). This widget is triggered by clicking and pressing the right mouse button. When released, it will commit to the new location/view. If a user right clicks and immediately releases the button, a regular context menu will appear.
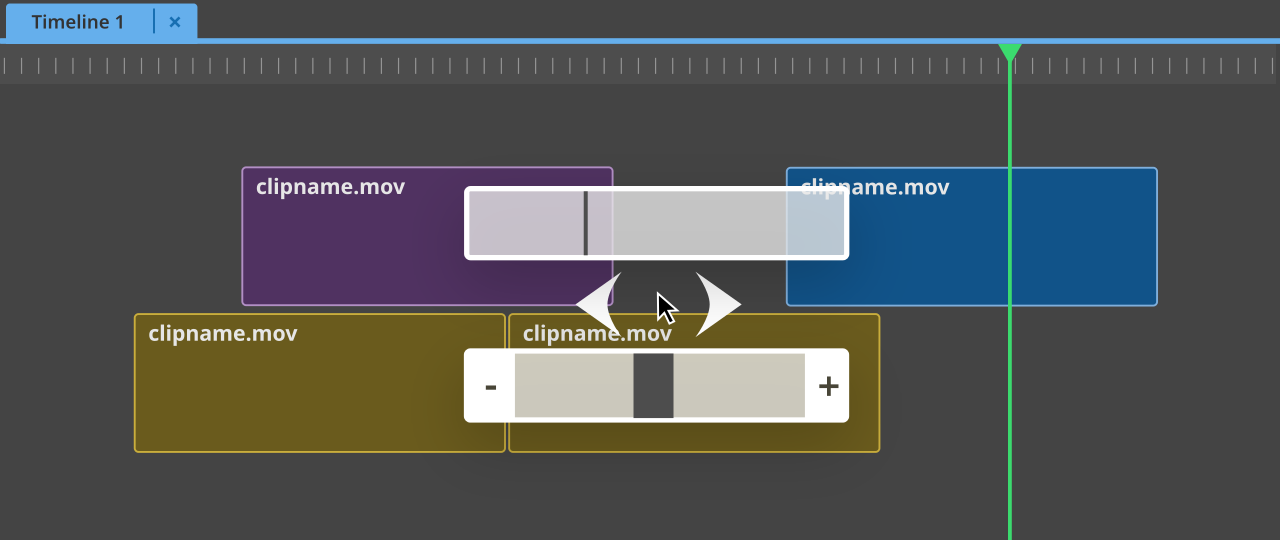 Figure 21. Combined skim, zoom and scroll widget
Why popup widgets?
I can’t speak for others, but personally I dislike moving the mouse downwards towards the edge of the screen to access scrollbars or zoom sliders. We’d like the mouse to stay in the centre of where we’re working.
With popup widgets, we might be able to improve navigation speed, but at the cost of familiarity and visibility. That’s why I propose to include all aforementioned widgets. We keep the traditional sliders and scrollbars, but also add the popup widgets as an extra method for navigation for whoever is willing to learn this.
Potential downsides
-
Widgets might be partially displayed offscreen when the mouse is near the edge of the screen.
-
Very long timelines might make the skimming widget oversensitive. Possible solution: either enlarge the bar, or create zones near the edges of the bar where the behaviour changes to be similar to the autoscroll widget.
-
When using the keyboard shortcut versions: a downside is having even more keyboard shortcuts that need quick access from the one hand that stays on the keyboard.
Selecting clips
Selecting a single clip happens in all NLE’s by left mouse clicking. Selecting multiple clips happens through box-select, by using left mouse and drag. Premiere and Resolve both offer “Selection follows playhead”, where the position of the playhead determines which clip gets selected. Then there are keyboard shortcuts, to select the next or previous clip on a track. Final Cut Pro lets you move the clip selection up and down by Cmd+up/down.
Selecting multiple clips by keyboard has no support that I know of in any big NLE. I would suggest to add this though, because the alternative for keyboard selection is the famous mark in/out range. That’s a pretty arbitrary way to indicate what you’d like to extract, lift or remove, and, in all fairness, this works great as long as your timeline has few tracks. However, once you have multiple overlapping clips on different tracks, combinations of mark/lift/extract/insert/overwrite require careful track selection and there are serious risks of throwing tracks out of sync. It’s not very convenient either, the moment you start creating J- or L-cuts. It’s a butcher’s knife that pays no respect to any kind of clip connections.
While we should support marking in and out points (and I’d advice to copy Lightworks' mark and park, where you only need to set a single mark and the playhead becomes the second mark) simply because most professional editors are so used to them, we should aim to include less destructive ways of arranging clips on the timeline. The natural element in the timeline is the clip, so I would suggest to focus on providing proper ways to select clips and edit the positions and durations of these clips, instead of relying on in and out marks to do the job.
I would propose to use the arrow keys for navigating clips and groups. There can be a cursor (for example, a white dot) which we can move left, right, up, and down by using the arrow keys. Changing the cursor from clip to clip will also move the playhead to the start of the highlighted clip - but this is secondary. A clip-based focus instead of playhead/cut-based focus will be different from what any other NLE does at the moment, but enabling multi-clip selection by keyboard will be a good reason to go in this direction.
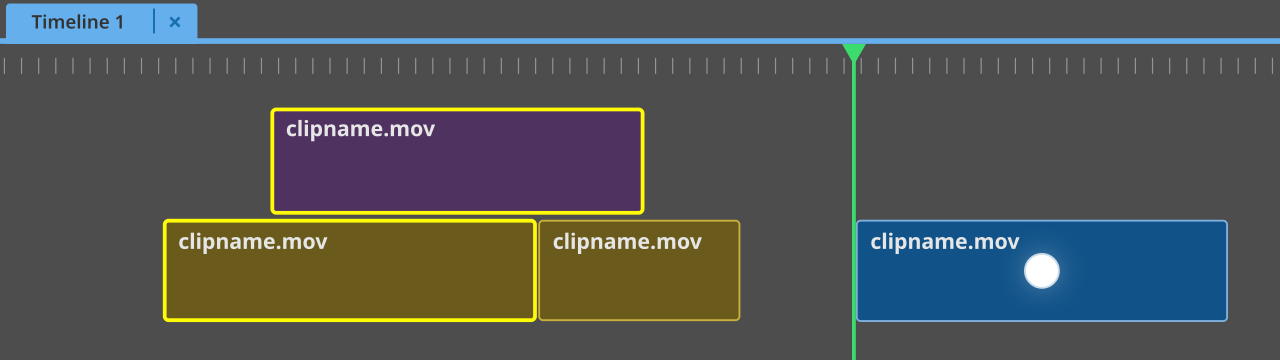
Figure 22. Selection mockup: selected clips are highlighted in yellow, the cursor is a white dot.
For selecting, we can introduce an “add to selection” key which adds the highlighted clip to the current selection (apart from the convention of using Ctrl+mouse click). We could also think of adding box-select by keyboard, by using a system with grid coordinates. One thing to note is that we do still need extra keyboard shortcuts to move the playhead frame by frame, independently from the clip selection. See the navigation subchapter for more details. Selection will be one of the previously mentioned contextual modes. The user can always return to their previous selection until they make a new one, by pressing the corresponding keyboard shortcut (S).
Most NLE’s have functions for selecting many clips at once, called “select forward” and “select backward”. In Adobe Premiere these are tools: click and you select all clips to either the left or right of the mouse cursor, and using Shift will toggle between selecting all clips on a single track or on all tracks (it doesn’t respect track activation status though, which it should). Other NLE’s (Resolve, Avid, Lightworks) have keyboard shortcuts for these functions (in Avid you can place a button in the GUI as well), which do affect activated tracks only. This is a bit faster: in Premiere you need to switch to the Select Forward/Backward Tool, make your selection, then switch back to your previous tool. With a keyboard shortcut you only have to press a single key (if your track selection is correct).
Arranging clips
Most NLE’s handle the arranging of clips in a destructive way. Drop one clip over another, and the clips underneath disappear. Move one of two clips that are connected by a transition, and the transition disappears. While it’s certainly true that experienced editors will understand the risks involved in moving clips and will therefore avoid such destructive behaviour unless they intend for something to be destroyed, accidents still occur and most probably someone won’t notice until much later, when undo cannot help to recover the lost work anymore.
At the same time, something as fundamental as swapping the position of two neighbouring clips is harder than it should. Premiere has Ctrl+Alt+drag, but the results can be destructive. Resolve has a similar modifier combination, and keyboard shortcuts for swapping left and right, but these also easily mess up parts of your edit if you’re not careful with your track selection. Avid’s smart tool has a Segment Mode that can be set to extract/splice-in, which will do a similar thing. It only has an effect on the tracks that hold the clip selection and results can get messy when there are J- or L-cuts. An alternative is to select a clip by mouse, use “ripple cut”, move the playhead to the next cut, and use “paste insert”, but this can also be destructive when not being careful with track management.
We’ve talked about using in and out marks already in the previous subchapter, so I will skip that for now.
FCP is the only widely used NLE as of now that allows non-destructively changing the order of clips, by having other clips move out of the way: the so-called magnetic timeline (see above). How come the other professional NLE’s make it so difficult to simply change the order of clips? The reason for that, I can only assume, is that the software doesn’t know how clips on different tracks relate to each other. And as a result, it will be very hard to guess how to exactly change the order. FCP solves this problem by having clips always connect to a primary storyline. Lumiera could do a similar thing by utilising its grouping features, in combination with a Ripple-toggle in the contextual bar of the selection mode. As long as clip relations are clear, changing the order of clips should be simple to achieve.
Trimming clips
Trimming means extending or shortening the duration of one or more clips (simultaneously), either from its start or end. In most applications, there are two distinct ways to trim: ripple trimming and non-ripple trimming. Ripple trimming means that when you extend or shorten a clip, all other clips on the same track and possibly on other tracks move along. When non-ripple trimming, all clips stay in place, and when a clip is shortened, a gap appears. To choose a trim type, NLE’s use either tools or modes.
-
FCP’s Select tool defaults to ripple trimming, and it’s Position tool does non-ripple trimming.
-
In Premiere it’s the other way around: the default selection tool does non-ripple trims, and the ripple edit tool… well, it’s in the name. A user doesn’t have to switch tools per se: pressing the Ctrl modifier will inverse a tool’s mode of operation.
-
Resolve talks in terms of modes, not tools, and it has two modes related to trimming: the default Selection Mode and Trim Edit Mode. The latter lets you ripple trim (by dragging the edges of clips), slip (dragging inside a clip, upper half) and slide (dragging inside a clip, lower half) — more on slip and slide edits later.
-
Avid has a trim mode that can be in overwrite trim or ripple trim mode, indicated by the colour of the trim sides (red or yellow). The timeline will be in either of these modes when entering trim mode.
-
Lightworks has a trim mode that defaults to ripple trimming, unless you specifically use the “drag to black” feature by Control-clicking trim edges when entering trim mode. When using the keyboard, one needs to mark a section and use the Remove command (similar to Avid’s “lift”) to create a gap.
Next to ripple/non-ripple trimming there are three other edit operations closely related to trimming that need to be mentioned:
-
Roll edits. This is where you move a cut left or right, so that as a result, one clips gets extended, while the other gets shortened.
-
Slip edits. Nothing gets extended or shortened. Instead, you shift the contents of one or more clips on the timeline.
-
Slide edits. This moves a selected clip (or clip selection) left or right, thereby keeping its own duration, while the duration of its surrounding clips gets altered.
Some apps use their trimming system for slip and slide edits (Avid, Lightworks). Others use a special tool or mode and/or separate keyboard shortcuts for this (FCP, Premiere, Resolve).
Selecting trim sides
Every trim starts by selecting which sides of which clips need to be included in the trimming. How many sides to select greatly depends on how many tracks are involved and if the NLE has a sync lock system or not. Sync locks makes sure that when you ripple trim selected clips, clips on other tracks automatically stay in sync. This means (manually) enabling or disabling the sync lock per track. Once set, trimming a single clip can be enough to have all tracks move along, although you might still need to manually select trim sides for overlapping clips to get the desired result.

Figure 23. Avid’s sync locks will split longer clips by default, in order to keep sync. Such destructive behaviour should be avoided in Lumiera.
Without sync locks you will have to select trim sides on every track that needs to stay in sync, although, as we’ll see, even that can be accomplished by a single keystroke. FCP is the exception here: it does not use sync locks (as it has a trackless design), but keeps sync not based on tracks, but on clip connections (this is discussed in the subchapter “Tracks vs Trackless”).
Let’s first examine trim side selection by mouse. This is generally as simple as clicking near the edge of a clip, or on the edge between two clips to select both sides for a roll edit.
Adding additional trim sides often works by using a modifier like Ctrl + left click (Premiere, Resolve, Lightworks, Avid). FCP does not allow the selection of multiple trim sides and therefore does not support asymmetric trimming. Such trims are still possible, but need to be performed in multiple steps rather than one.
Keyboard selection of trim sides happens in general by providing shortcuts for selecting the left (A) side, the right (B) side, or both, of a cut (Avid, Premiere, Resolve and FCP, although the latter does not have a shortcut for selecting both sides as it uses a dedicated Trim tool for roll edits). This applies to the cut nearest to the playhead. Lightworks is the only NLE with a slightly different, but very powerful method: instead of A/B/both, it has four shortcuts:
-
Trim last out
-
Trim in
-
Trim out
-
Trim next in
These apply to all clips (or gaps) on enabled tracks underneath the playhead. These commands can be combined: when pressing multiple keys, new trim sides are added to the selection. This allows for quickly selecting many trim sides on many tracks.
Figure 24. One keystroke led to the selection of these four trim sides in Lightworks
Another feature that was already mentioned in a previous chapter, is FCP’s precision editor, which can be triggered by double clicking a cut or by keyboard shortcut. This shows how much footage from each clip is available for trimming and allows ripple trimming as well as roll edits to be performed by mouse or keyboard. DaVinci Resolve added a similar thing called Trim Editor, but positions it at the bottom of the Timeline Viewer.
Performing the trim
Usually we see four ways to perform a trim:
-
Frame by frame. This can be done by mouse by clicking and dragging the edges of a clip, or by keyboard by using shortcuts for “left one frame”, “right one frame”, “left 10/many frames”, “right 10/many frames”. Instead of using keyboard shortcuts, dedicated hardware can be used to joggle left or right to perform trimming.
-
By specifying an exact amount of frames. Pretty much every NLE supports using the plus and minus keys on the keypad to enter exact frame numbers. Lightworks and Avid do an excellent job at this: when not entering any amount (so just plus/minus + enter) they will repeat the last entered amount of frames.
-
Dynamic trimming. This means moving the cut (or slipping or sliding a clip) by using the JKL-playback controls. Avid and Lightworks have dynamic trimming support within their trim modes. Resolve has a separate switch for this that needs to be toggled, and Premiere has a separate mode for dynamic trimming, simply called “Trim Mode”. FCP does not seem to support dynamic trimming at the time of writing — although some people disagree and say that the “Extend Edit” function, when used in the Precision Editor, achieves a similar result.
-
All of the big NLE’s have keyboard shortcuts that will trim either the start or the end of a clip to the position of the playhead, in ripple and non-ripple flavours.
Previewing the cut
Most NLE’s feature a Preview keyboard shortcut with user-adjustable pre-roll and post-roll duration. Avid always does a looped preview around the cut in trim mode when triggering playback.
Entering and exiting trim mode
Avid and Lightworks have keyboard commands to both enter and exit their trim modes. When used for entering, Lightworks will re-enable the previous trim side selection. FCP’s precision editor can be closed with the Escape key, as can Avid’s trim mode.
Analysis and proposal
My proposal is to use the clip selection system to highlight a clip, and then have three commands:
-
Select the clip’s in point as trim side
-
Select the clip’s out point as trim side
-
Select the clip’s in point for a roll edit
If the latter is pressed a second time, it will take the clip’s out point for a roll edit. When the first two shortcuts are pressed once, they select the trim side for ripple trims. When pressed again, they will switch to non-ripple trims (and back again with another press). There should be a clear visual difference between these two (perhaps through the colour of the brackets, as in Avid).
Note that this approach resembles Lightworks, and is different from Avid, FCP, Premiere and Resolve. Those apps take a cut (closest to the playhead) as the basis for choosing a trim side. Lightworks takes the underlying clip as its basis. Since we already have a mechanism for navigating clips, we should probably not add another mechanism just for navigating cuts.
I propose to not make use of sync locks. They apply to entire tracks and we previously established that clips that have no relation to each other might share a track, so it makes little sense to provide track based operations. We should instead take the actual clip connections that the user establishes into account. This way we also don’t need to be able to select multiple trim sides at once (for complex asymmetric trimming operations), as this can create sync problems elsewhere on a track.
Trimming itself doesn’t need to be reinvented. Trimming frame by frame, by a specific amount of frames or dynamically through playback make perfect sense and offer a full range of options, from extremely precise to trimming on gut feeling. Ideally trimming sides should stay active and we won’t need to enter or exit a trim mode. However, we should consider that we need the following keyboard shortcuts:
-
Trim left many frames
-
Trim left 1 frame
-
Trim right 1 frame
-
Trim right many frames
These same keys can’t double for nudging clips, the way it does in many apps, without using modes. Therefore my proposal is indeed to introduce a Trim mode. As said, it should be designed as a contextual mode that we fluidly enter and exit and that is visually easy to distinguish from the regular mode, which we can call the Navigation mode. Trim mode can be accentuated by marking the part of the timeline we’ll be previewing. As in Avid, in trim mode playback could always preview the selected cut, so we won’t need a special Preview (sometimes called “Play around”) shortcut, (editing transitions should also engage the trim mode, in that case). Trim mode will be exited automatically whenever the user clicks in an empty spot of the timeline or presses the trim mode key (T). This key can also be used to return to the last-used trim configuration.
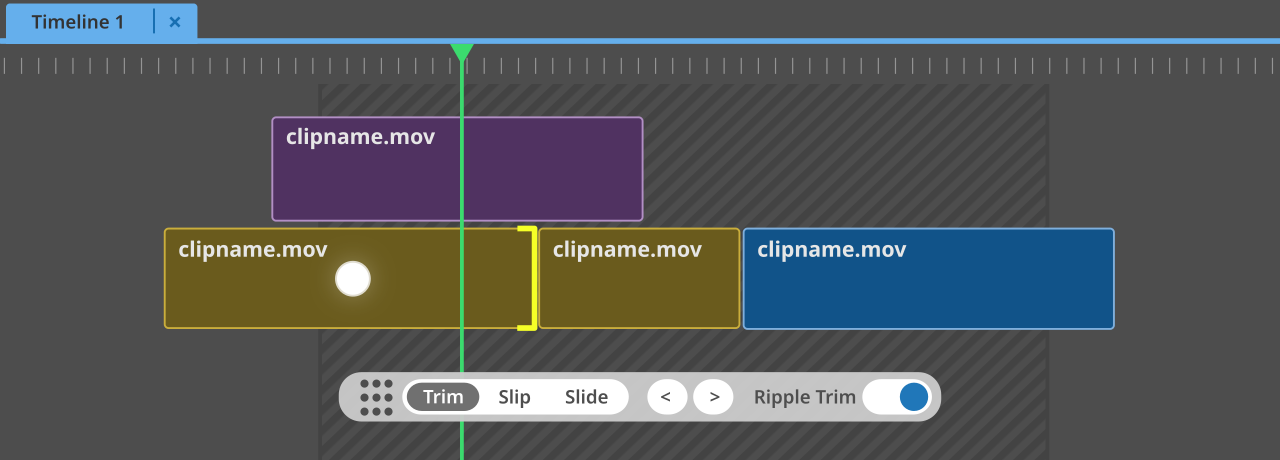
Figure 25. Mockup of the trim mode. The striped area marks the pre- and post-roll that will be previewed.
Splitting and merging clips
Tool-based NLE’s offer a Blade or Cut tool that will cut clips wherever a user clicks. All NLE’s offer a dedicated keyboard shortcut for creating a cut at the playhead as well.
Merging two timeline clips with so-called “through edits” is often possible by selecting the cut for a roll edit and pressing the delete key. A through edit occurs when two successive segments of the same source clip are placed directly next to each other in the timeline (so as a result, it looks as if there wasn’t a cut at all). A Blade tool, a shortcut for Add Cut and the ability to remove through edits with backspace seem all worth implementing.
Removing clips
In general, we find the following options to remove clip from a timeline:
-
Select a clip, then: backspace or delete key, or (ripple) cut command.
-
In and out points, then lift or extract.
-
Lightworks lets you remove a clip by dragging it outside of the timeline window.
-
Trimming a clip so it will end up with a duration of 0 frames.
These operations are so common that I would not change them.
-
Dropping another clip on top. This is something that we could consider changing, especially when the clips that will be removed are offscreen.
Organising the timeline: sections
I would like to propose the ability to divide a timeline into multiple sections. Each of these sections will have a header in the ruler that can be edited, to give each section a name (similar to how duration markers in Premiere are displayed).
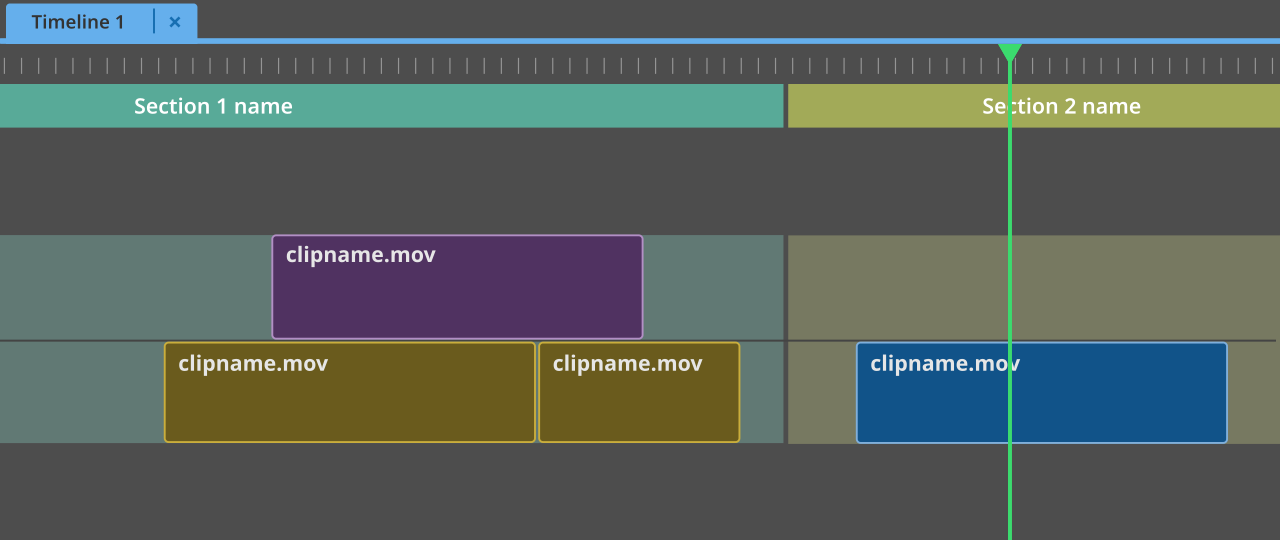
The benefits of sections:
-
Creating a broad sense and clear overview of how a timeline is constructed. Background colours in the timeline will make it easy to differentiate between different sections.
-
Easy navigation between sections by keyboard shortcuts.
-
Keeping sync. All clips in a section are encapsulated. If you work in one section, you will not be able to throw clips in other sections out of sync. Users could also time-lock a section, so it will stay in place regardless of other edit operations. This is especially useful when editing on music, but will also prevent losing sync between other elements that have been carefully lined up. Sections will not prevent anyone throwing anything out of sync within a section, but at least not the entire timeline will be affected.
-
The order of sections can easily be changed by clicking and dragging. This way sections can be used to, for example, easily change the order of scenes. The free-flowing editor for example, can construct different parts of their edit on different parts of the timeline in different sections, and then arrange them later.
-
Sections could have a versioning system: this would allow the user to try different cuts within a section and to quickly change between these different versions.
Several other characteristics of sections:
-
Clips can be excluded from being part of a section. For example: music tracks could span the entire length of a video by not being included in any section.
-
When working within a section, its size will adapt to your edit operations (so its edges will shrink or expand automatically while trimming or moving clips).
-
A new timeline will have one large section spanning its entire length. A “split section” button and keyboard shortcut will create new sections.
Things to consider:
-
How to move clips from one section to another?
-
If sections can be time-locked then they will probably need to be able to overlap.
Adding and editing transitions
There’s usually a variety of ways to add transitions:
-
Right clicking on a cut and choosing a transition from a context menu
-
Double clicking or dragging a transition from an effects or transitions panel
-
With keyboard shortcuts. Premiere has separate shortcuts for audio and video transitions, others (Lightworks, Resolve) have a single transition shortcut that detects whether a video or audio transition needs to be added. The default length can often be adjusted in the app’s settings, as well as the default transition type. Some apps have shortcuts to create a transition from a clip’s start or end to the position of the playhead.
-
Avid has a configuration panel for adding transitions:
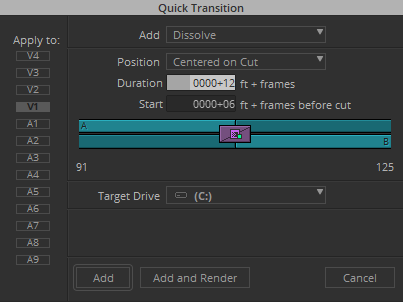
-
Some apps allow adding transitions to every cut in the in-out range (Avid, Lightworks). Avid gives you the option to skip cuts that already have a transition. Very useful for adding short (2-4 frame) audio transitions to each audio clip that doesn’t have a specific transition applied already.
-
Most apps allow adding transitions to a selection of clips.
-
Blackmagic’s Speed Editor lets you select different transitions through a button press and the big dial, and lets you adjust its length through the dial as well.
Editing transitions:
-
Changing a transition’s duration always works by dragging the transition handles in between clips (in Avid you will need to have Transition Manipulation enabled for this to work).
-
Changing a transition’s position sometimes works by dragging it left or right (Premiere, Avid).
-
Avid lets you type in the duration underneath the viewers.
-
Often you can double click a transition to enter a duration.
-
Final Cut Pro has a right click context menu option called “Change Duration” (Ctrl+D) which lets you enter the desired duration by keyboard and press enter, for video transitions. Audio transitions are actually performed by creating fades and having these fades between clips overlap. They can be adjusted with the fade handles and require the “Show Audio Lanes” or “Expand Audio” options to be enabled.
-
Lightworks lets you trim transitions via its trim mode like any other cut.
-
DaVinci Resolve and Final Cut Pro have a Transition tab on their Inspector panels where length and position of transitions can be adjusted, among other settings.
Most of these established ways of working with transitions can be applied to Lumiera. I would like to suggest to also add Avid’s option to add transitions to a large number of cuts while skipping existing transitions (and this should even be the default).
One thing we do need to address is how transitions magically disappear in pretty much any NLE except Avid and Final Cut Pro, the moment you move one of the two adjacent clips elsewhere, or whenever you replace a clip by another. Transitions take time to setup in the right way, and they shouldn’t disappear by themselves. I would suggest to follow Avid and FCP’s behaviour and leave transitions in place by default.
Changing timeline clip properties
Each NLE has an effect properties panel en most have a generic properties panel for changing all basic properties of clips in the timeline, such as:
-
X & Y position
-
scaling
-
orientation
-
rotation
-
opacity and blend mode
-
stabilisation
Avid is the only NLE out there that still requires adding an effect to change these basic clip properties (“3D DVE”). Quick access to such properties saves a lot of time, so enabling this is essential. Depending on the actual effects workflow we might want basic properties to be part of an effect that is automatically applied to each clip when it’s added to the timeline. A separate Properties panel (as in Premiere) is less ideal: the fewer panels, the better. FCP and Resolve use a tabbed approach for their panels (which is named “Inspector”) to keep different categories of properties separated.
Chapter 3: finishing
To be written.
-
Nodes vs Layers
-
Audio mixing
-
Color grading
-
Visual effects compositing
-
Titling
Chapter 4: a broader GUI concept
To be written.
-
Panels vs fixed layouts.
-
Workspaces.